Create a Grid Engine Elastigroup
Step 1: Open the Creation Wizard
In the Elastigroups view, select Create to open the Creation Wizard.
Step 2: General Configuration
- Name: Choose a name for the Elastigroup. We recommend using a naming convention based on the specific workload the Elastigroup will manage.
- Region: Select an Azure Region the Elastigroup will run in.
Elastigroup Capacity
- Target: The number of Low Priority VM's in your Elastigroup.
- Minimum: In the case of a 'scale down' policy action, this is the minimum number of running Low Priority VM's in the group.The minimum acceptable value is 0.
- Maximum: In the case of a 'scale up' policy action, this is the maximum number of running Low Priority VM's in the group. The minimum acceptable value is 0.
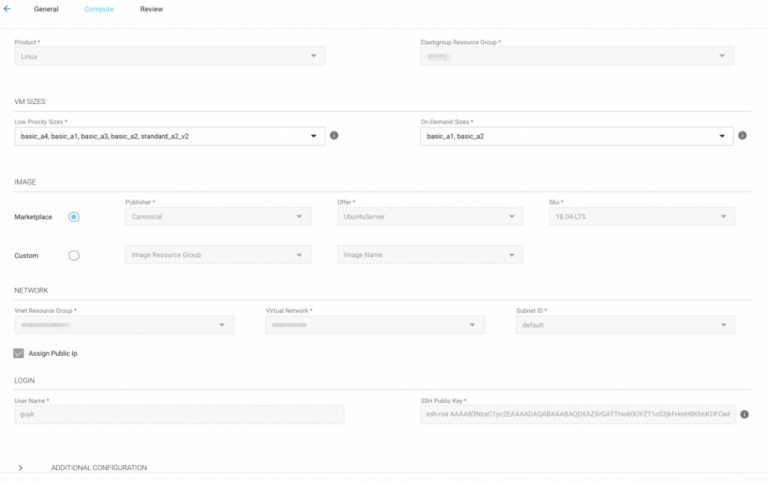
Step 3: Compute
- Product: Select an OS, can be either Linux or Windows.
- Elastigroup Resource Group: Elastigroup launches Virtual Machine Scale Sets (VMSS) to manage your Low priority VMs. Select the Resource Group for Elastigroup to launch these VMSS's into.
- Low priority Sizes: Select the Low Priority VMs sizes to be available for the Elastigroup. Make sure the selected VM size is available in the desired Region.
Tip: To maximize cost savings, provide the Elastigroup with all possible Low-Priority VM sizes compatible with the expected workload. The more VM sizes, the better the odds Elastigroup will find an available Low-Priority VM to run on.
- On-Demand Sizes: Select the Regular Priority VMs sizes within the Elastigroup. These are used in the event that no Low-Priority VMs are available in the sizes requested. Make sure the selected VMs are available in the desired Region.
- Image:
- Marketplace: choose one of the Images available in the Azure Marketplace.
- Custom: Choose one of your custom VM Images.
- Network:
- Vnet Resource Group: Select the Vnet Resource group you want your Elastigroup Scale Sets to be a part of.
- Virtual Network: Select the specific Virtual Network (VN) for your Elastigroup.
- Subnet ID: Select the specific Subnet inside your VN.
- Assign Public IP: Check this mark of you wish VMs in this Elastigroup to launch with a Public IP.
- User Name: Specify the User you wish to SSH the VM's with.
- SSH Key/Windows Password: The Public SSH Key for the specified User. If Windows is the selected VM product, this will be a password.
A valid SSH Public Key is required to create an Elastigroup.
Step 4: Review
In the review page fill in the ClusterID and queue name under thirdPartiesIntegration as explained in the following example:
{
  "group": {
    "thirdPartiesIntegration": {
      "hpcGridEngine": {
        "clusterId": "mycluster",
        "queues": [
          {
            "name": "queue1"
          },
          {
            "name": "queue2"
          }
        ]
      }
    }
  }
}