Set up GitHub Actions
GitHub Actions is a continuous integration and continuous delivery (CI/CD) platform that automates, builds, and tests the deployment of pipelines. You can create workflows that build and test every pull request to your repository or deploy merged pull requests to production.
Scale and manage your GitHub workflow jobs by hosting your GitHub runners in Elastigroup and Spot Connect.
Prerequisites
- Connect your AWS account to Spot.
- Spot Connect in private preview mode. You can enable it in your account by contacting your sales representative or by contacting the Spot support team at
support@spot.io. - Integrate Spot Connect with your Spot Elastigroup account that hosts the GitHub runners by creating an API token in the Spot console with a minimum of Elastigroup create and update permissions.
Step 1: Add Spot Services to Spot Connect
The following procedure describes how to add the Spot integrations to Spot Connect.
-
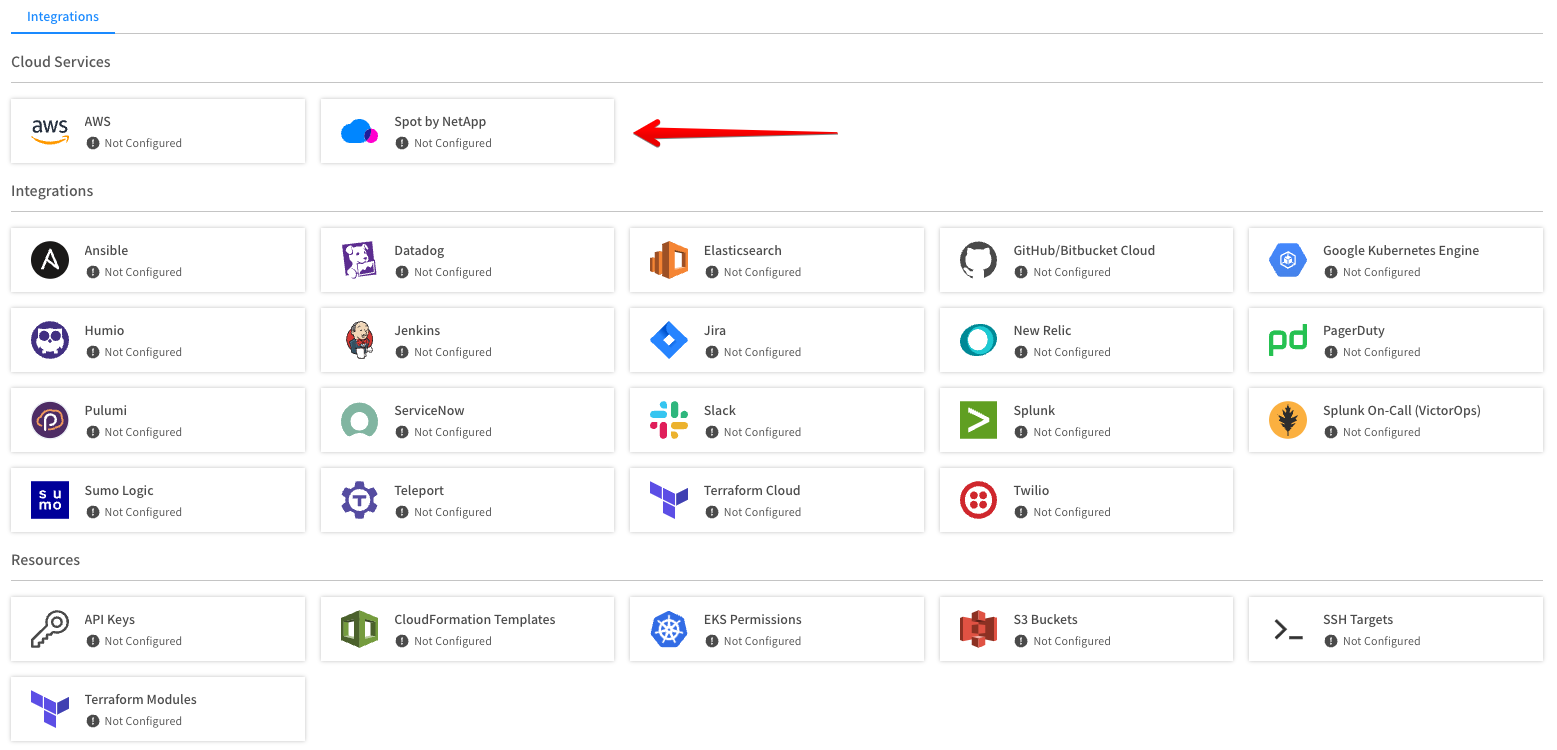
In the left main menu in the Spot console, click Connect and click Settings.
-
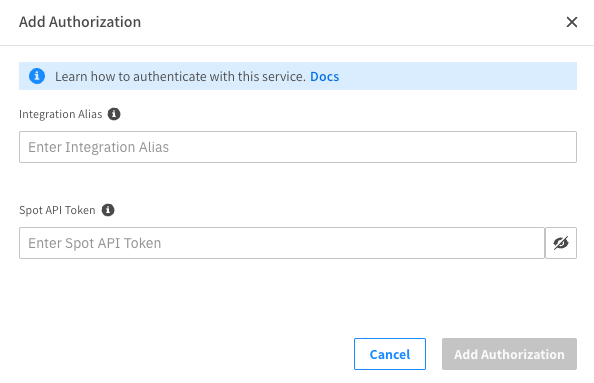
Under the Cloud Services tab, select Spot by NetApp and click Add Authorization.
-
Insert the API token you created in the Spot console with Account Name Alias and add the API authorization in the Spot account that hosts all the GitHub runners.
Step 2: Configure the GitHub Integration in Spot Connect
The following procedure describes how to configure the GitHub integration in Spot Connect.
-
In the left main menu in the Spot console, click Connect and click Settings.
-
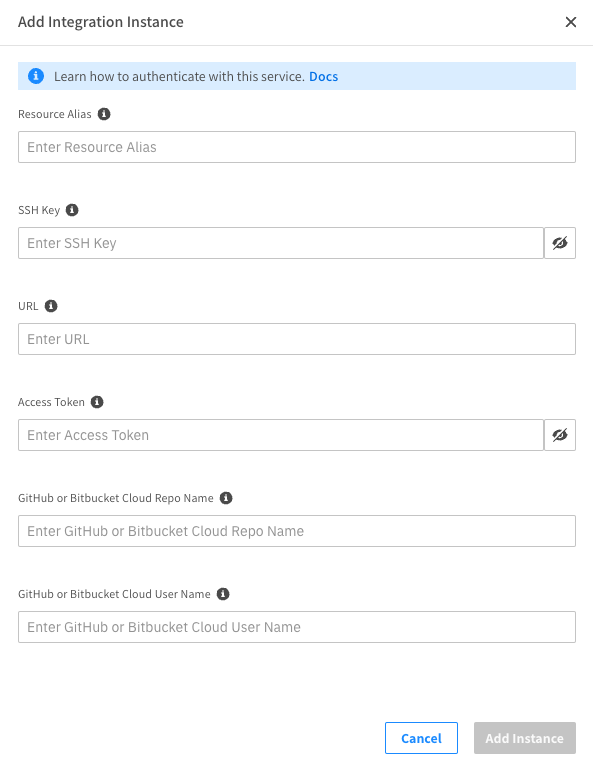
In the Integrations section, select GitHub/Bitbucket Cloud and click Add Integration.
-
Enter the GitHub credentials that you will use in your Elastigroup data.
-
Enter the GitHub repo, username, and access token. You must create an access token with the admin:org scope.
Step 3: Create API Key in Spot Connect
Create an API Key in Spot Connect that GitHub Webhook uses to trigger the scale up Spot Connect workflow.
- In the left main menu in the Spot console, click Connect and click Settings.
- In the Resources section, select API Keys and in the top right click + Add New.
- Create and note down the API Key.
Step 4: Configure Elastigroup
Elastigroup hosts your GitHub runners. After you create an access token in GitHub that provides access to the admin:org scope, add your GitHub username and GitHub repository where the runners will be registered under GitHub credentials of the userdata template.
An example of a user data template that installs and configures the latest x86 based Linux GitHub runner:
#!/bin/bash
# GitHub credentials
github_user=<Your GitHub User>
github_repo=<Your GitHub Repository>
PAT=<Your GitHub Token>
# Download jq for extracting the Token
yum install jq -y
# Create and move to the working directory
mkdir /actions-runner && cd /actions-runner
# Download the latest runner package
curl -o actions-runner-linux-x64-2.304.0.tar.gz -L https://github.com/actions/runner/releases/download/v2.304.0/actions-runner-linux-x64-2.304.0.tar.gz
# Extract the installer
tar xzf ./actions-runner-linux-x64-2.304.0.tar.gz
# Change the owner of the directory to ec2-user
chown ec2-user -R /actions-runner
# Get instance id to set it as a runner name
MetadataToken=`curl -X PUT "http://169.254.169.254/latest/api/token" -H "X-aws-ec2-metadata-token-ttl-seconds: 21600"`
instance_id=$(curl -H "X-aws-ec2-metadata-token: $MetadataToken" http://169.254.169.254/latest/meta-data/instance-id)
echo "$instance_id"
# Get the runner's token
token=$(curl -s -XPOST -H "authorization: token $PAT" https://api.github.com/repos/$github_user/$github_repo/actions/runners/registration-token | jq -r .token)
# Create the runner and start the configuration experience
sudo -u ec2-user ./config.sh --url https://github.com/${github_user}/${github_repo} --token $token --name "${instance_id}" --labels spot --unattended
# Create the runner's service
./svc.sh install
# Start the service
./svc.sh start
The user data above creates a self-hosted runner and registers it to the repository with the runner label spot.
The runner configuration and start configuration of GitHub in ./config.sh must include --name "${instance_id}". The scale-down flow uses the runner’s name to identify the idle instance to scale down. Without the --name you won’t be able to scale down the right instance.
You can find more information on how to create and manage Elastigroup here.
Create the Elastigroup from the following provisioning tools of your choice and note down the Elastigroup ID (sig-...):
- The Spot Console
- The Spot API
- Terraform
- CFN
- SDK
Configure Spot Connect Scale Up Template
You can configure the Generic Webhook by duplicating the scale up template.
-
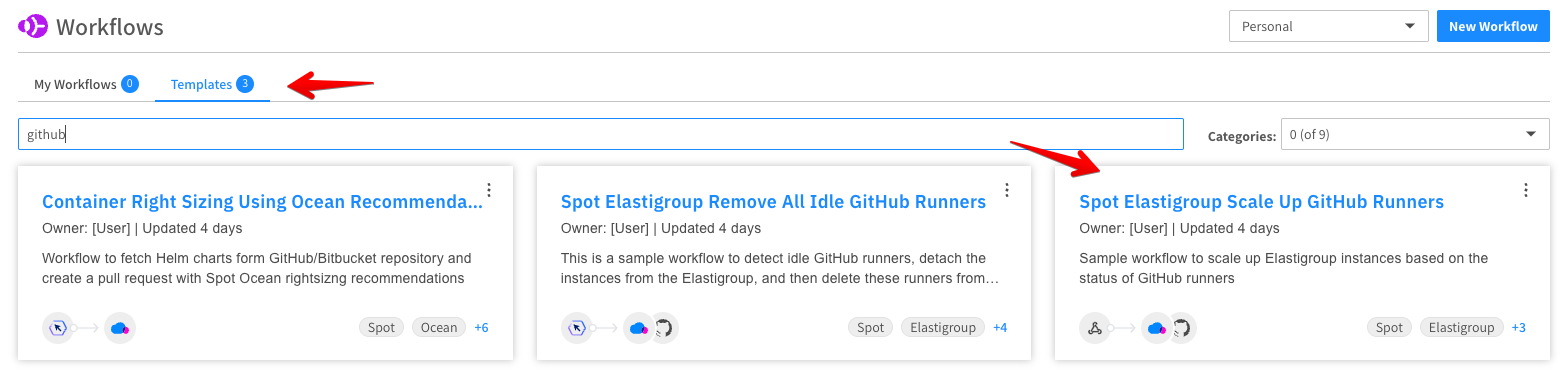
In the left main menu in the Spot console, click Connect and click Workflows.
-
Under the Templates tab, select the Spot Elastigroup Scale Up GitHub Runners template.
-
Click Duplicate.
-
Click the Generic Webhook resource and select the Spot Connect API Key created in Step 3 as the Webhook API Key Name. Note down the generated Webhook API key value and URL.

-
To configure the GitHub webhook, refer to the GitHub repository settings where the workflow and runners will be hosted in.
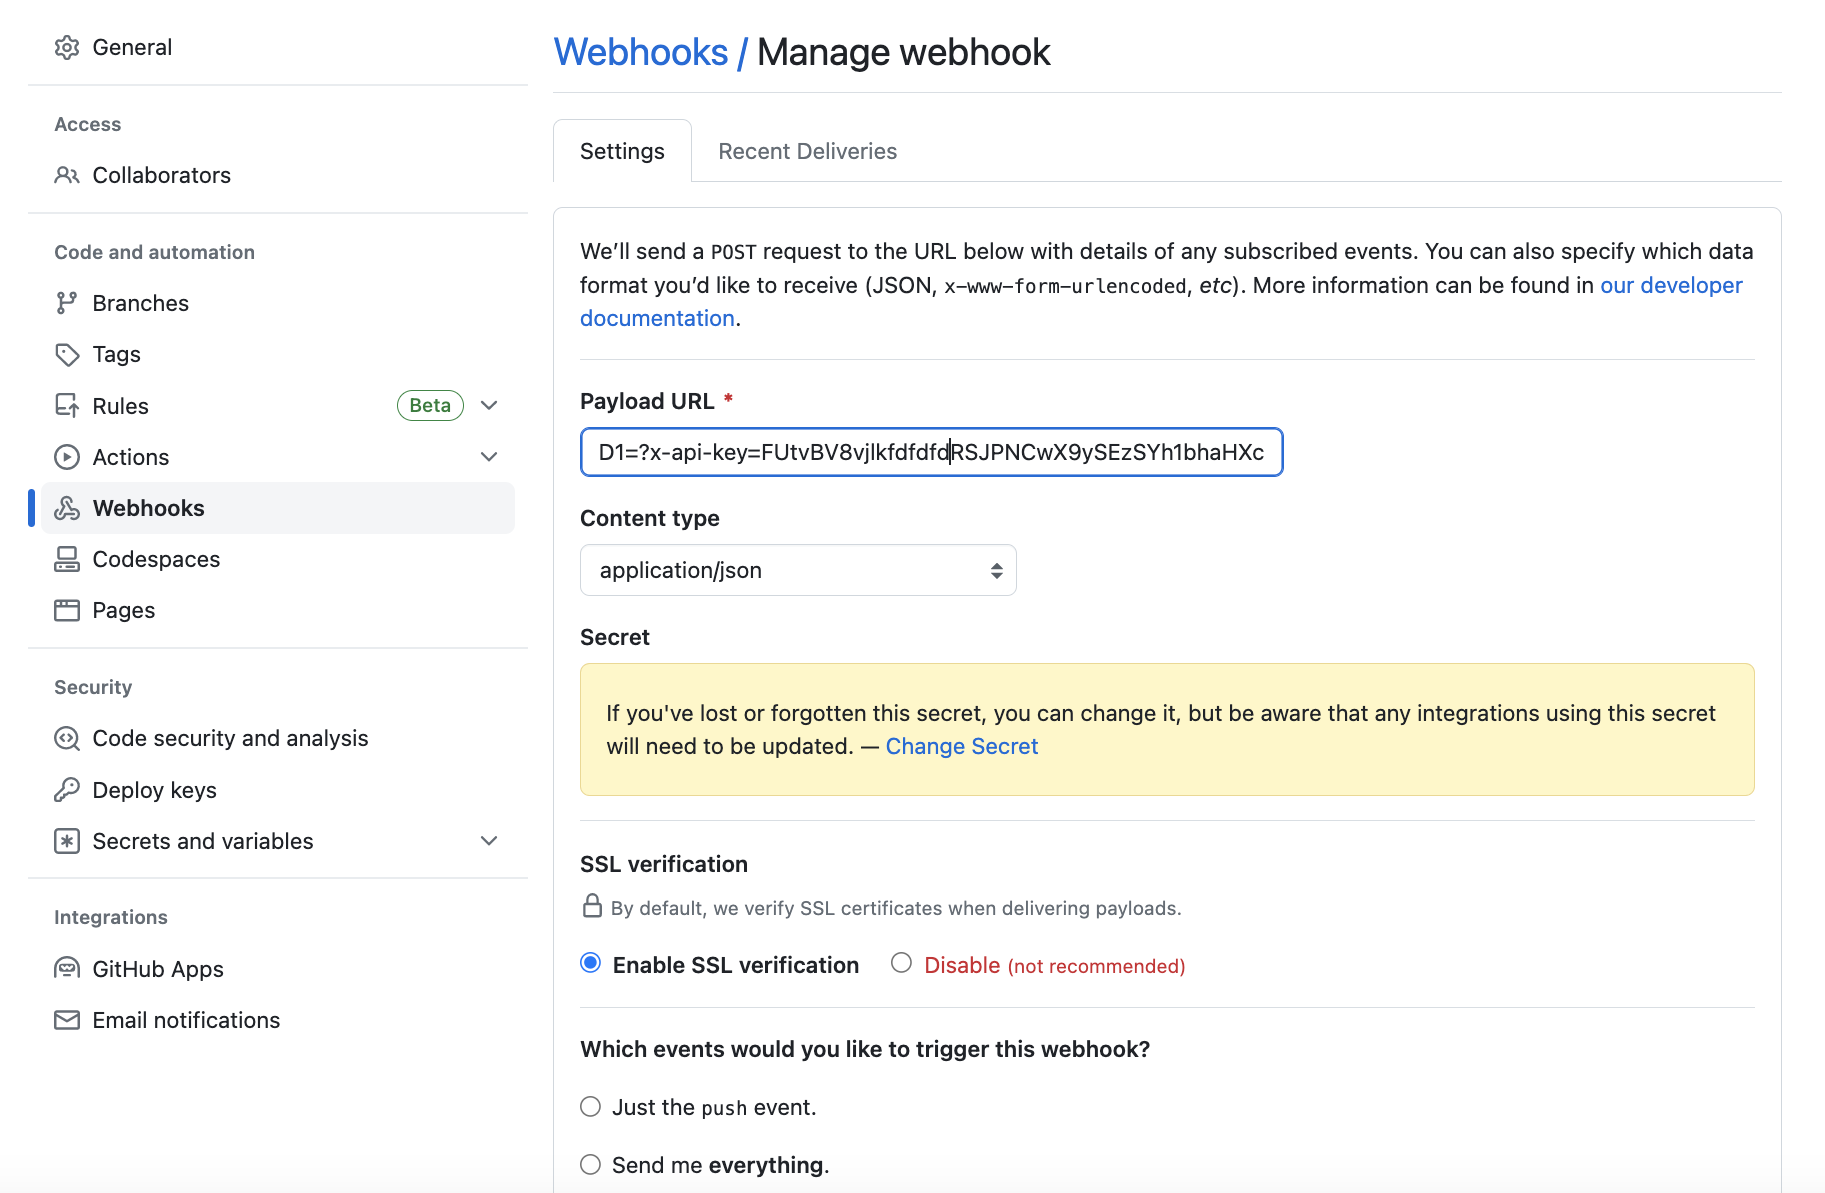
The Payload URL of the GitHub Webhook is based on the Spot Connect Generic webhook API URL and the Spot Connect API Key which was created in Step 3 and selected in Spot Connect scale-up workflow:
<Add your ScaleUpWebhookURL>?x-api-key=<Add your Spot Connect API Key>. The content type must be set to an application/JSON.An example of a GitHub Webhook payload URL:
https://api.connect.fylamynt.com/api/webhooks/run_workflow/webhook/KBMfw0ISfXPCg_NUAVUy05K11-CiQKOCV4FUyI2PG1BfiUkMz0yUmMFPysDI9I=?x-api-key=aaLJfvMCtq2gAqj8uLOg6f5k5knfcnr399w5Njkl. -
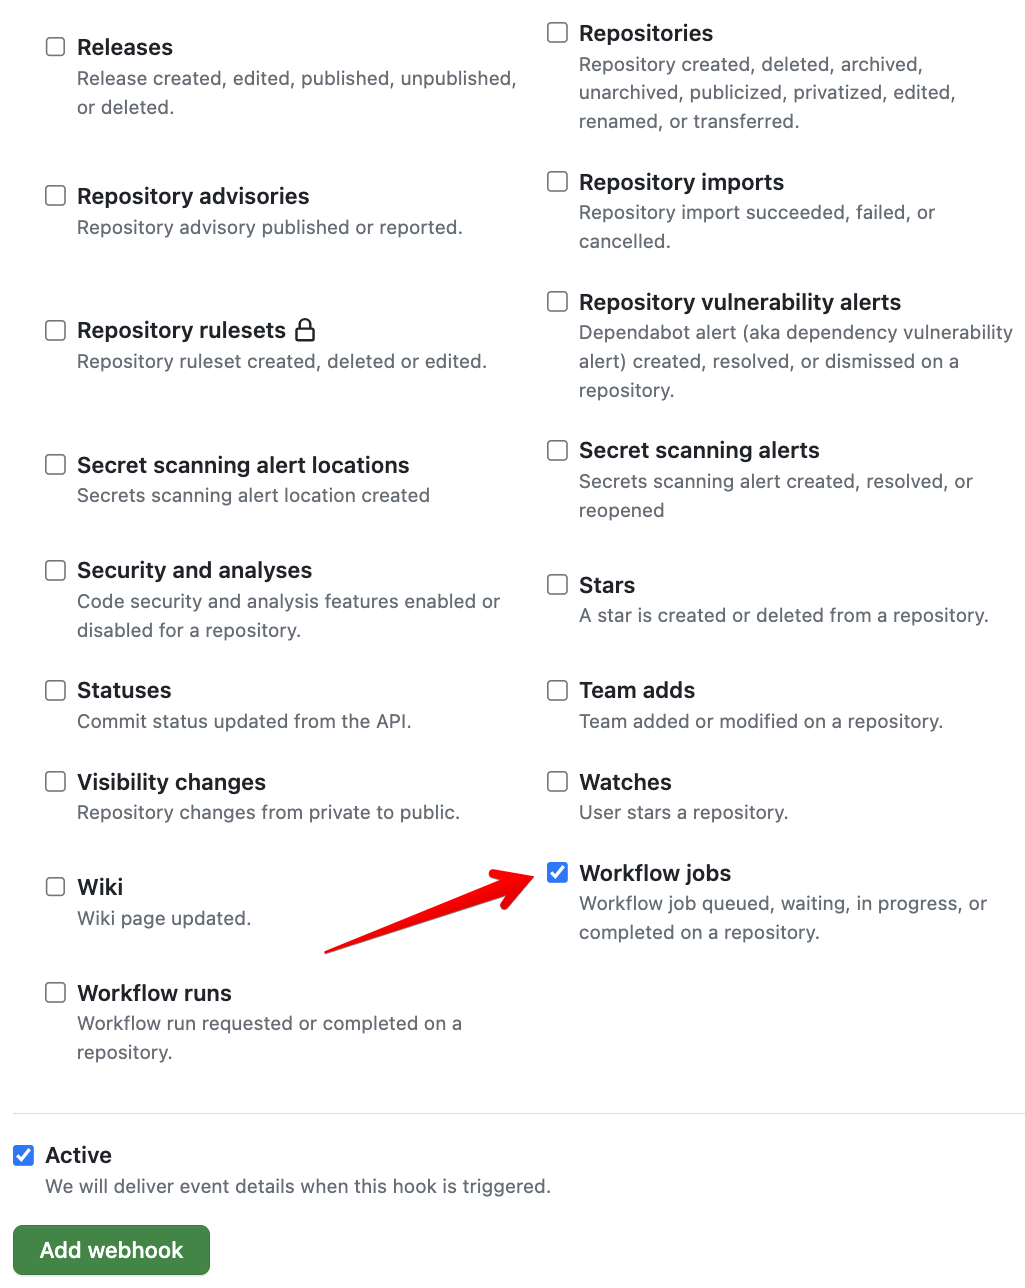
Complete the GitHub Webhook setup by Marking Workflow Jobs to trigger the webhook for workflow jobs events.
-
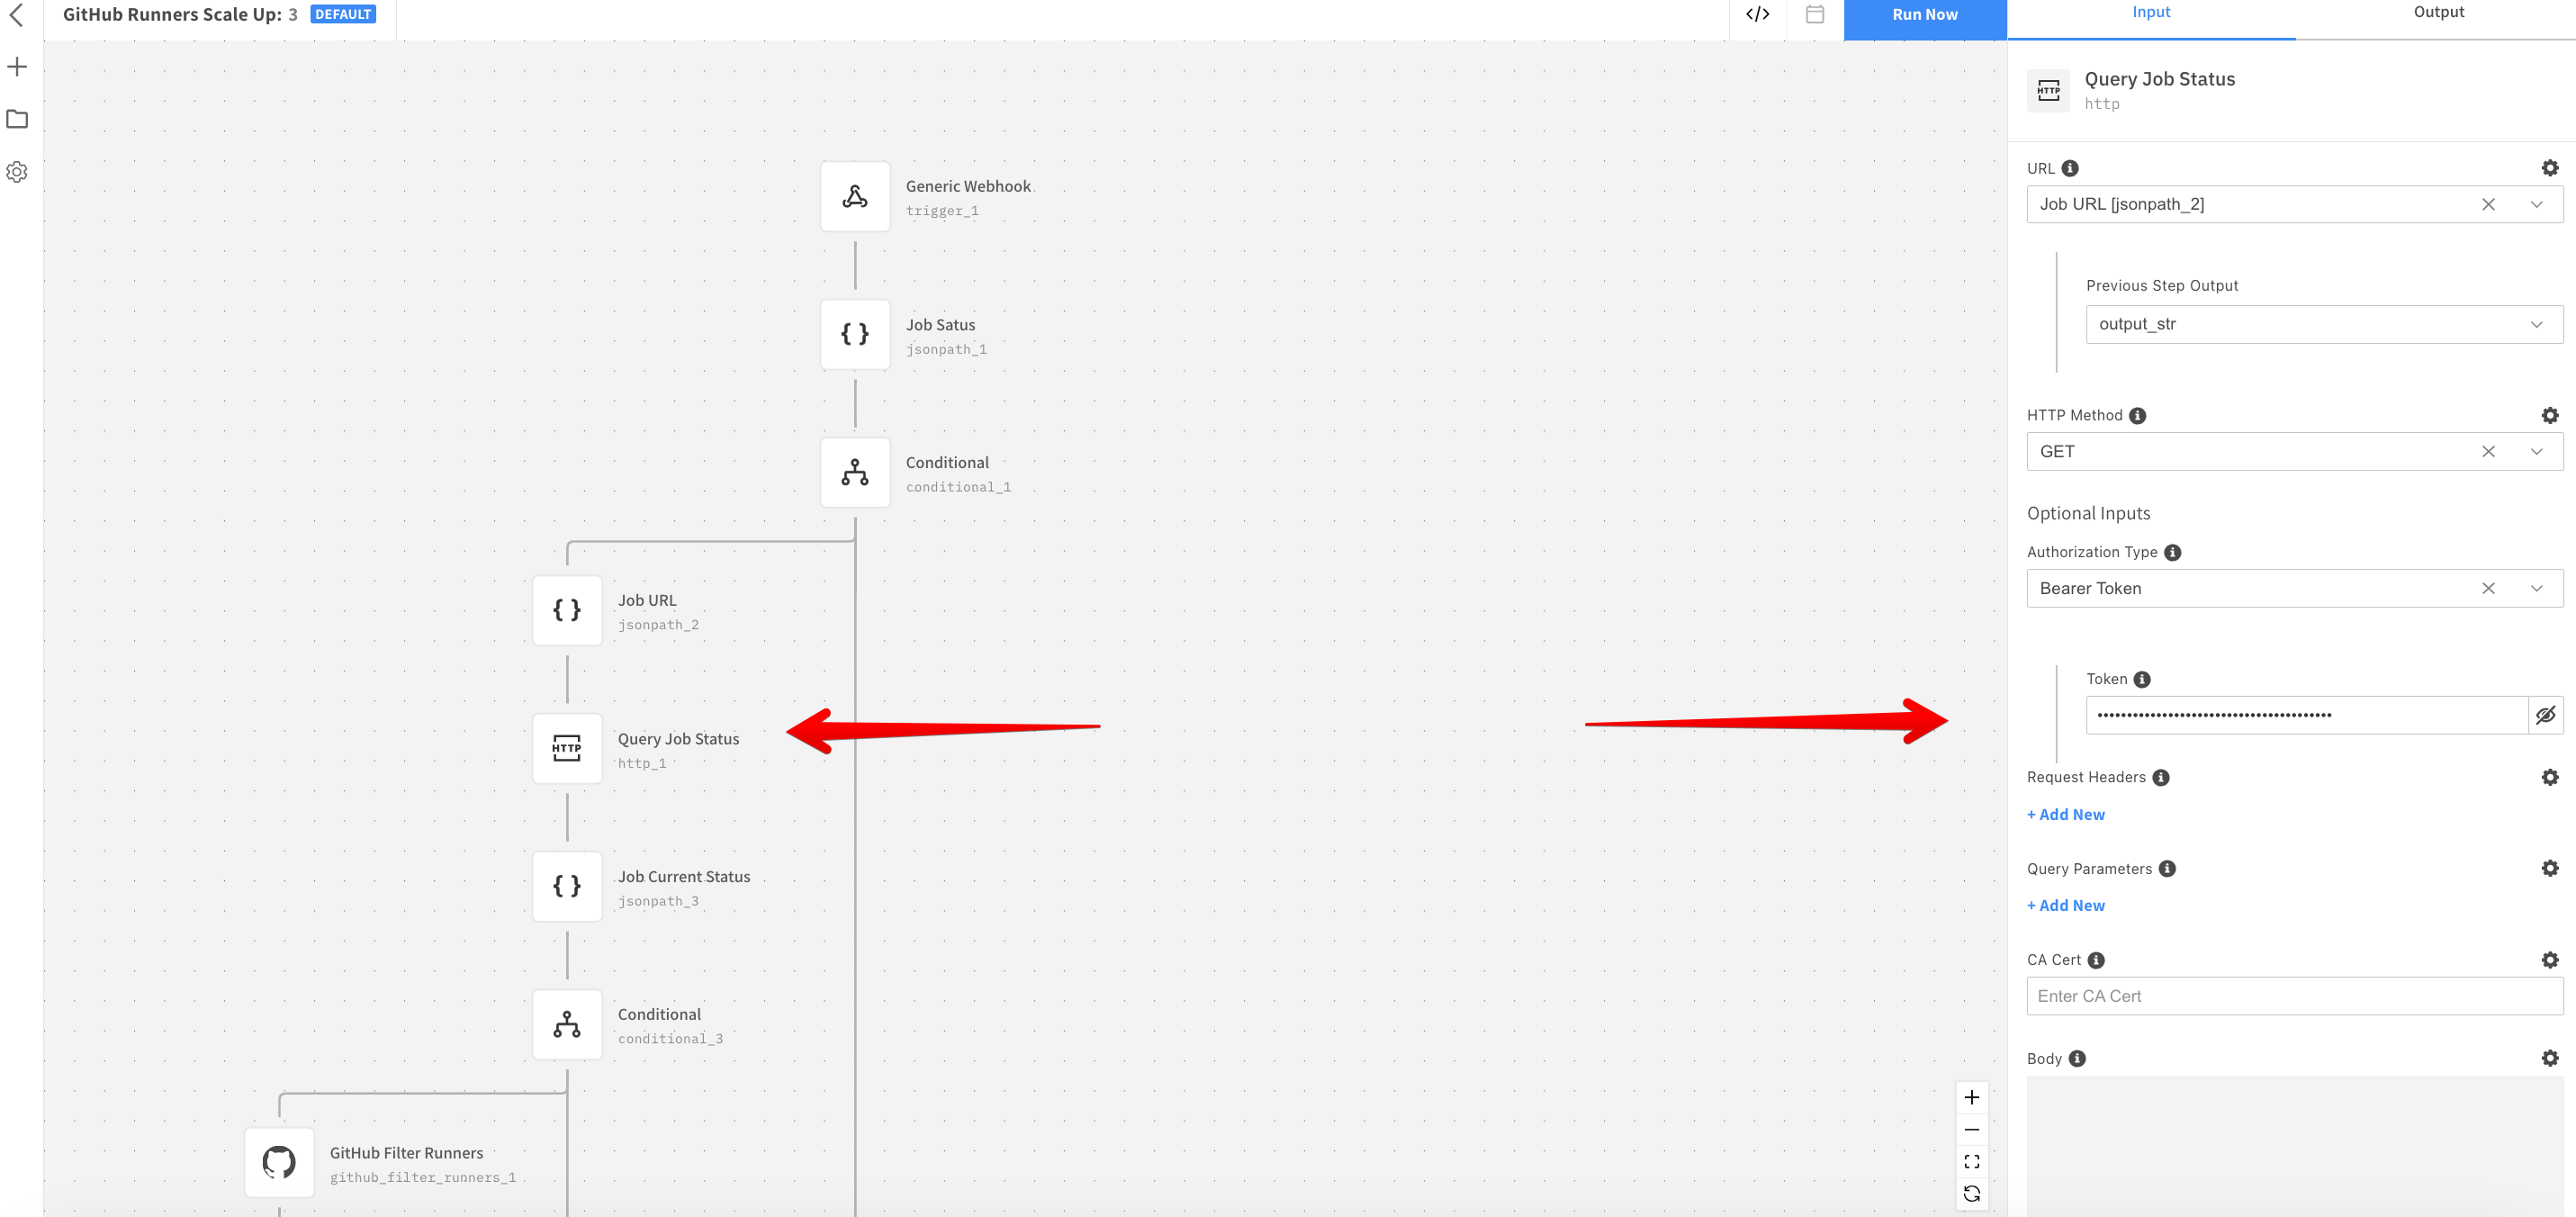
Add the GitHub Token in Query Job Status resource. You can:
- Use the GitHub token you already created.
- Create an access token with a minimum of the repo scope.
Configure the GitHub Filter Runners
Configure the GitHub Filter Runners resource by selecting the GitHub repository configured in Step 2.
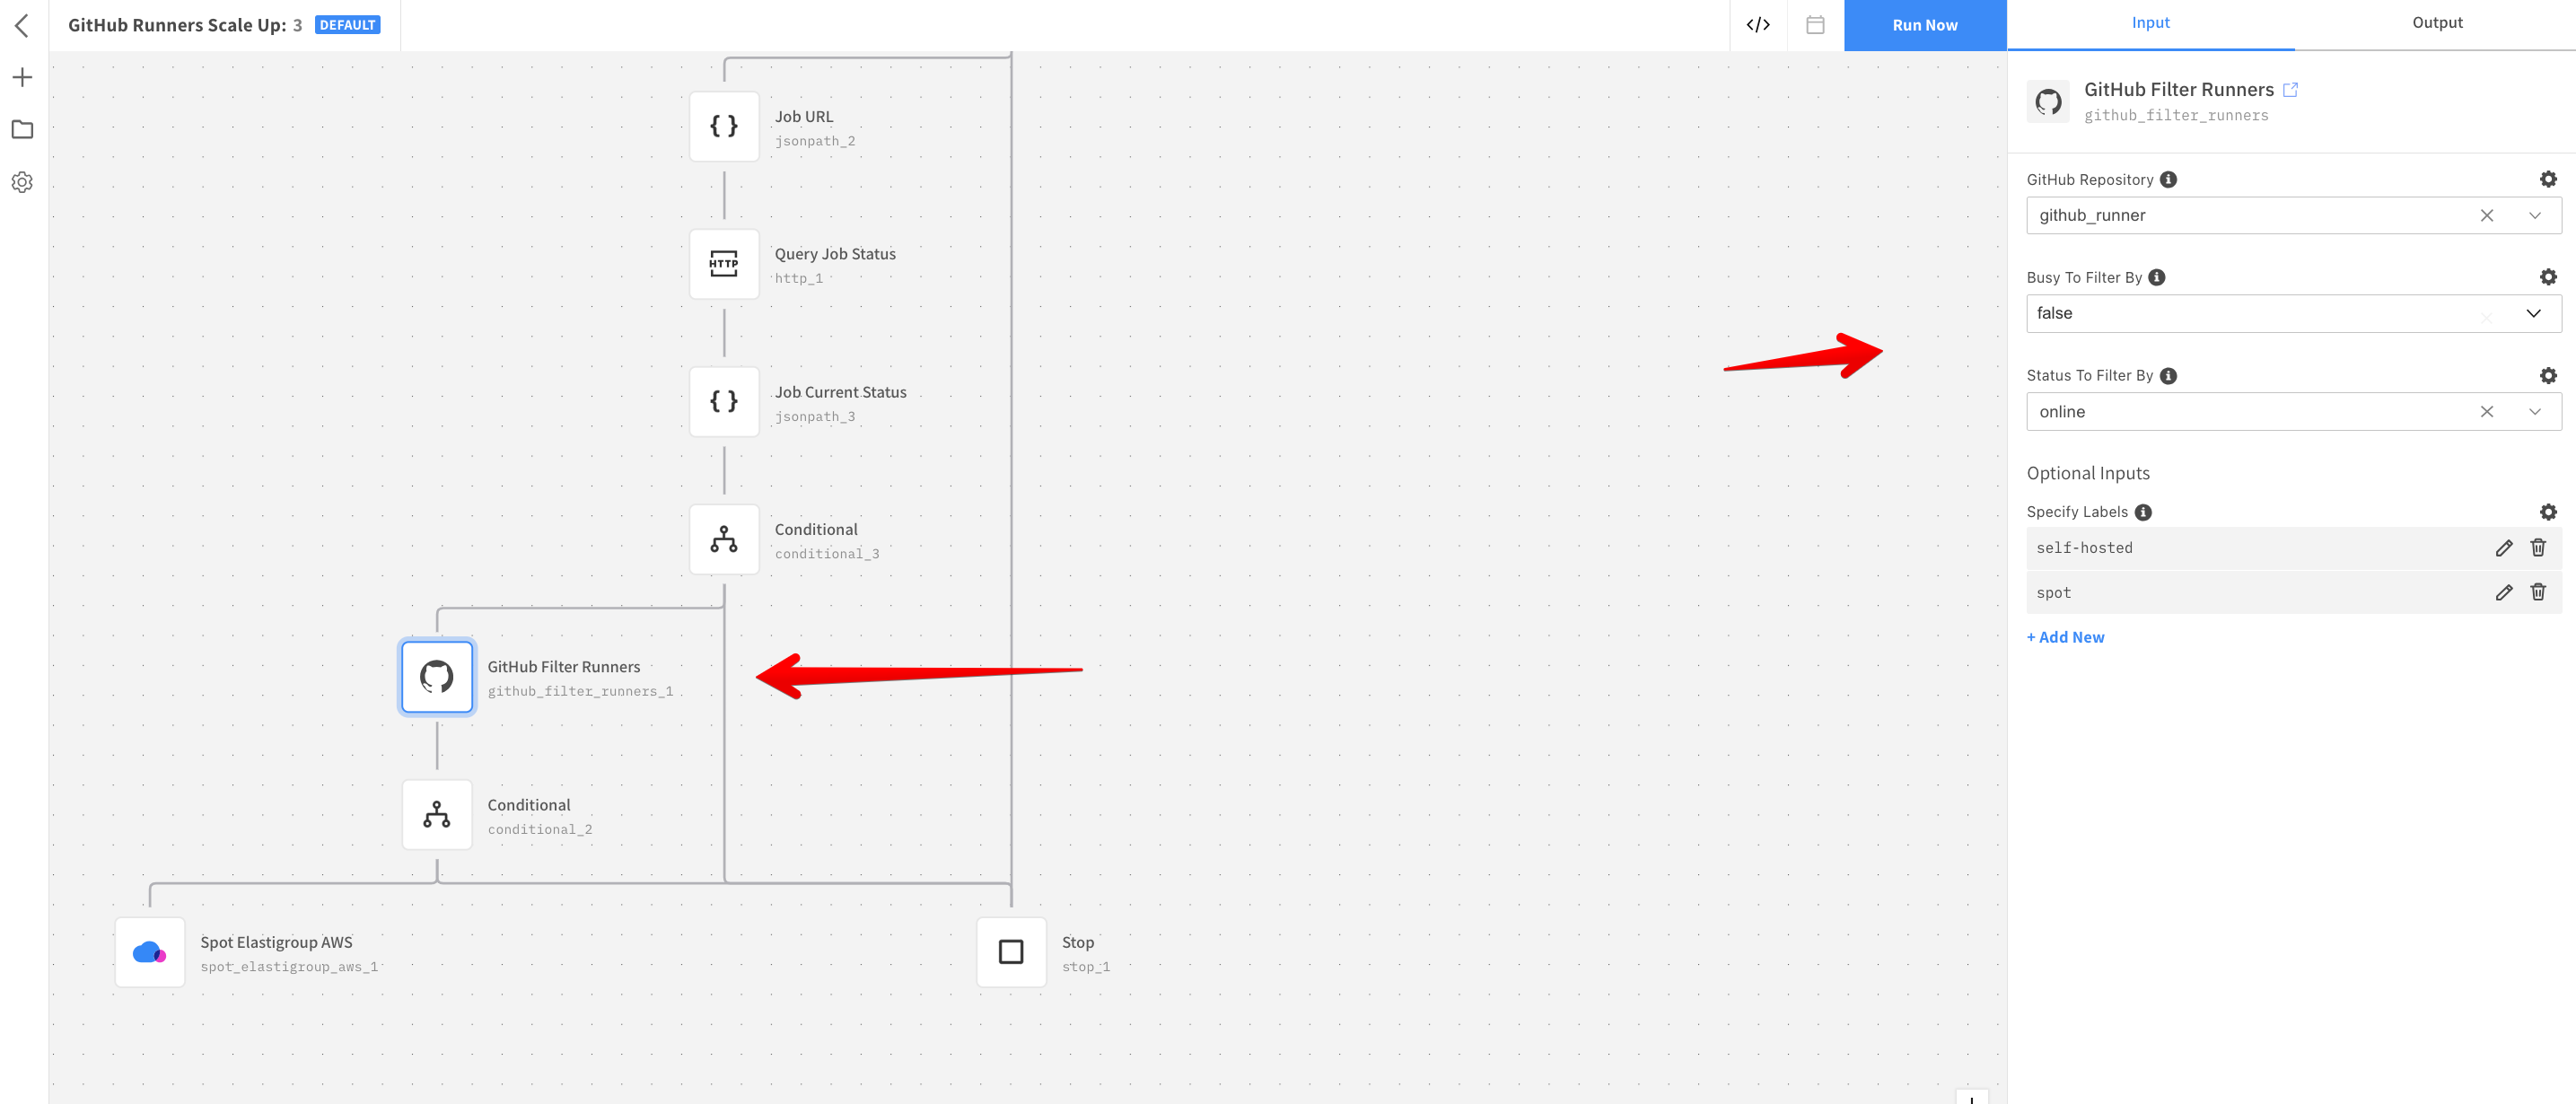
- Click the GitHub Filter Runners action node.
- Ensure the Busy filter is set as
falseand the Status filter is set asonline. - Match the Specify labels in the GitHub Filter Runners with the workflow jobs and the user data. In this guide, the Workflow Jobs use the custom spot label and the inbuilt
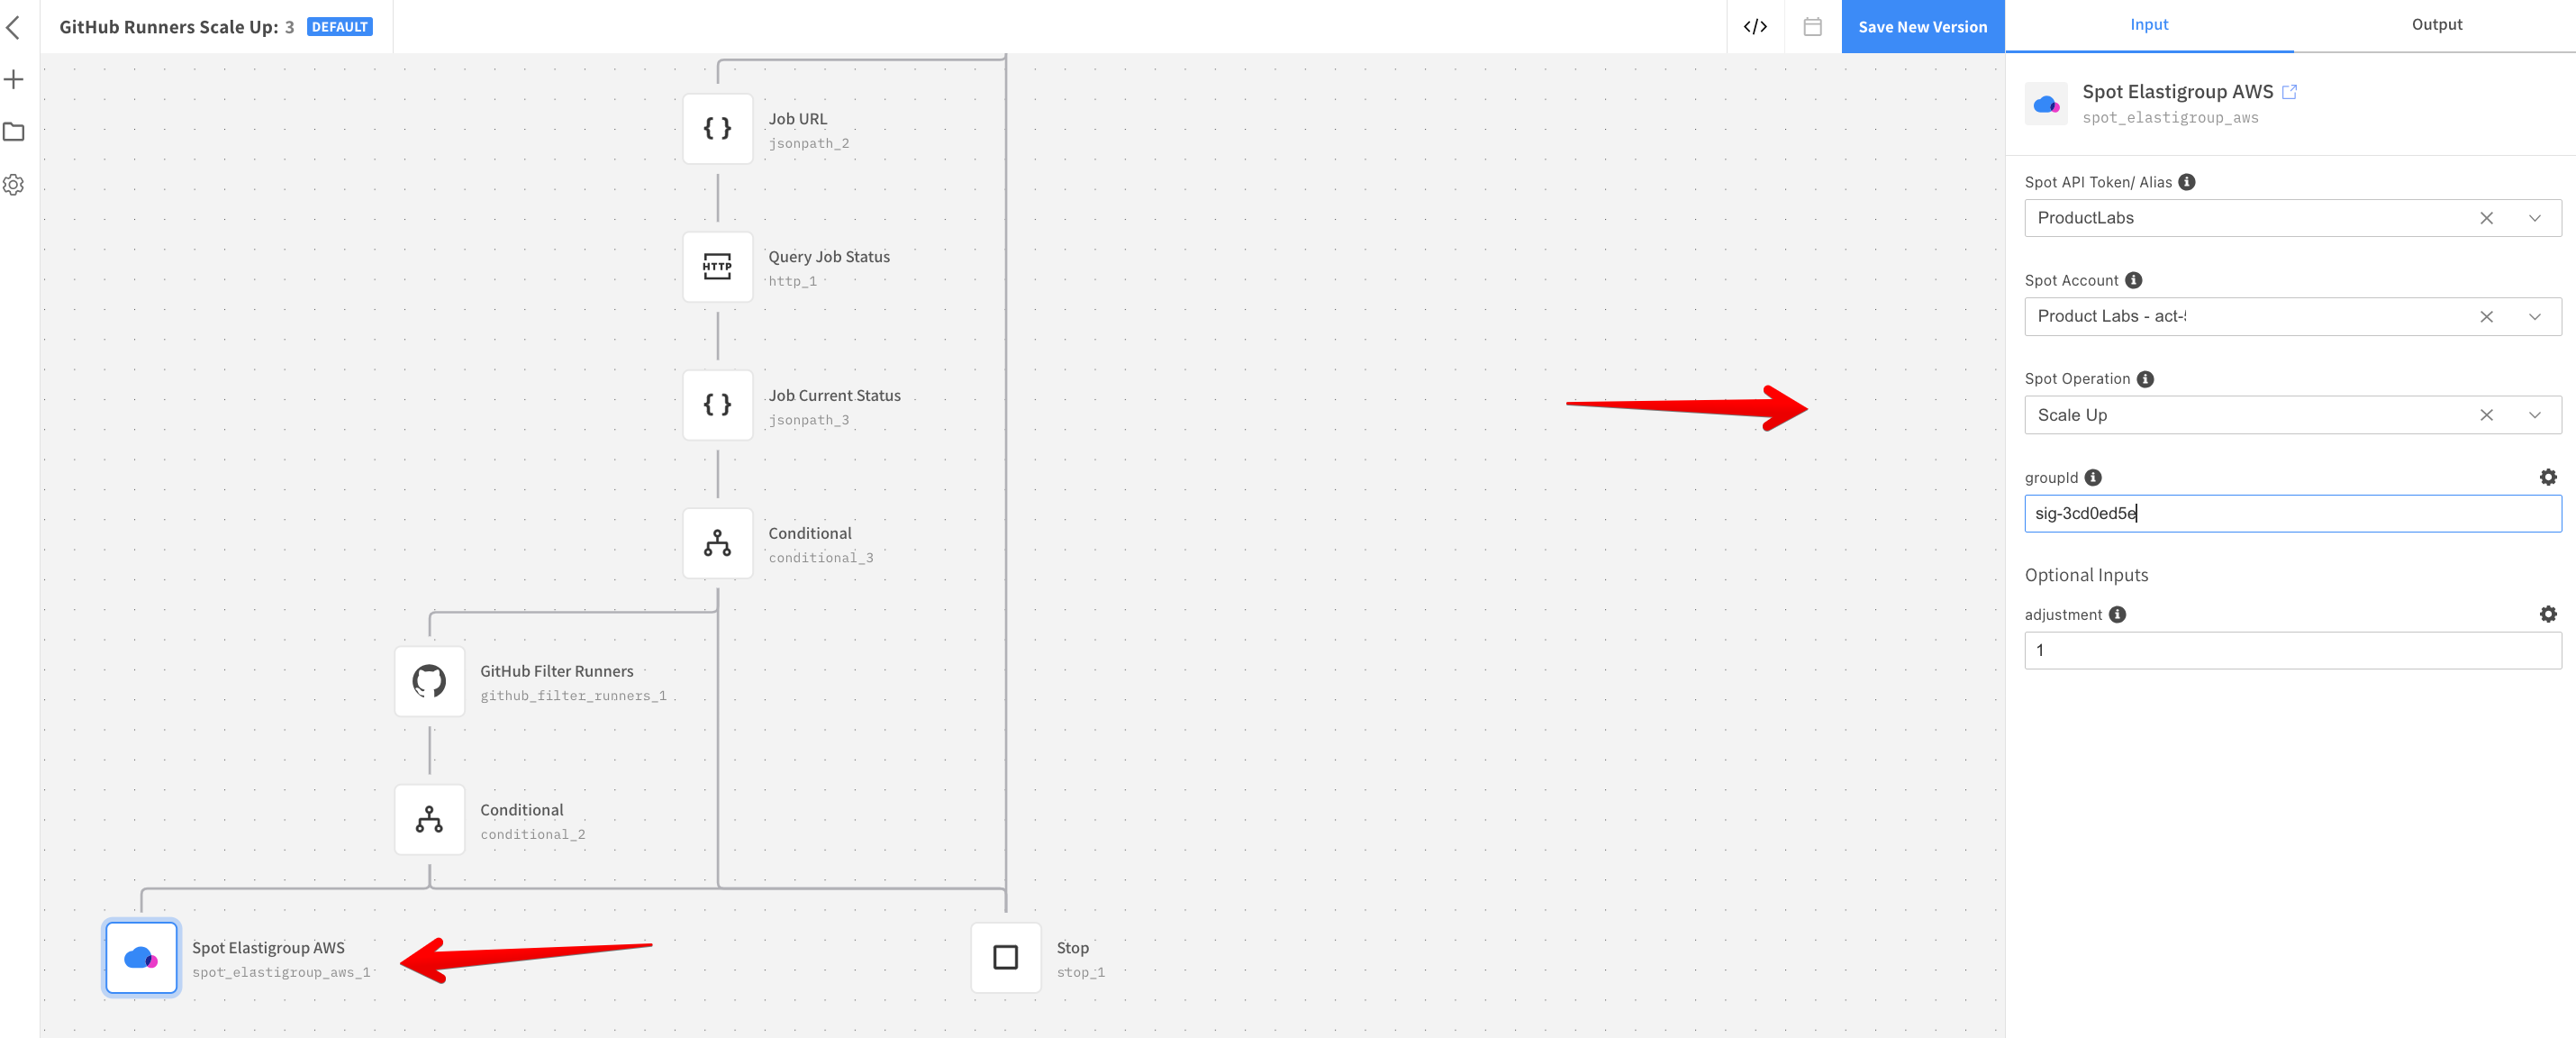
self-hostedlabel. The GitHub resource ensures that the scale-up is triggered only if there are no idle instances alive that match the labels required by Workflow Jobs. This results in avoiding any unnecessary scale-ups. - Configure the Spot Elastigroup AWS resource by selecting Spot Instance configured in Step 1. Select the Spot Account and Elastigroup ID you created in Step 4. The Spot Operation must be kept as Scale Up in the Spot Operation field with an adjustment of one instance at a time.
Configure Spot Connect Scale Down Template
-
In the left main menu in the Spot console, click Connect and click Workflows.
-
Under the Templates tab, select the Spot Elastigroup Remove All Idle GitHub Runners template and Click Duplicate.
-
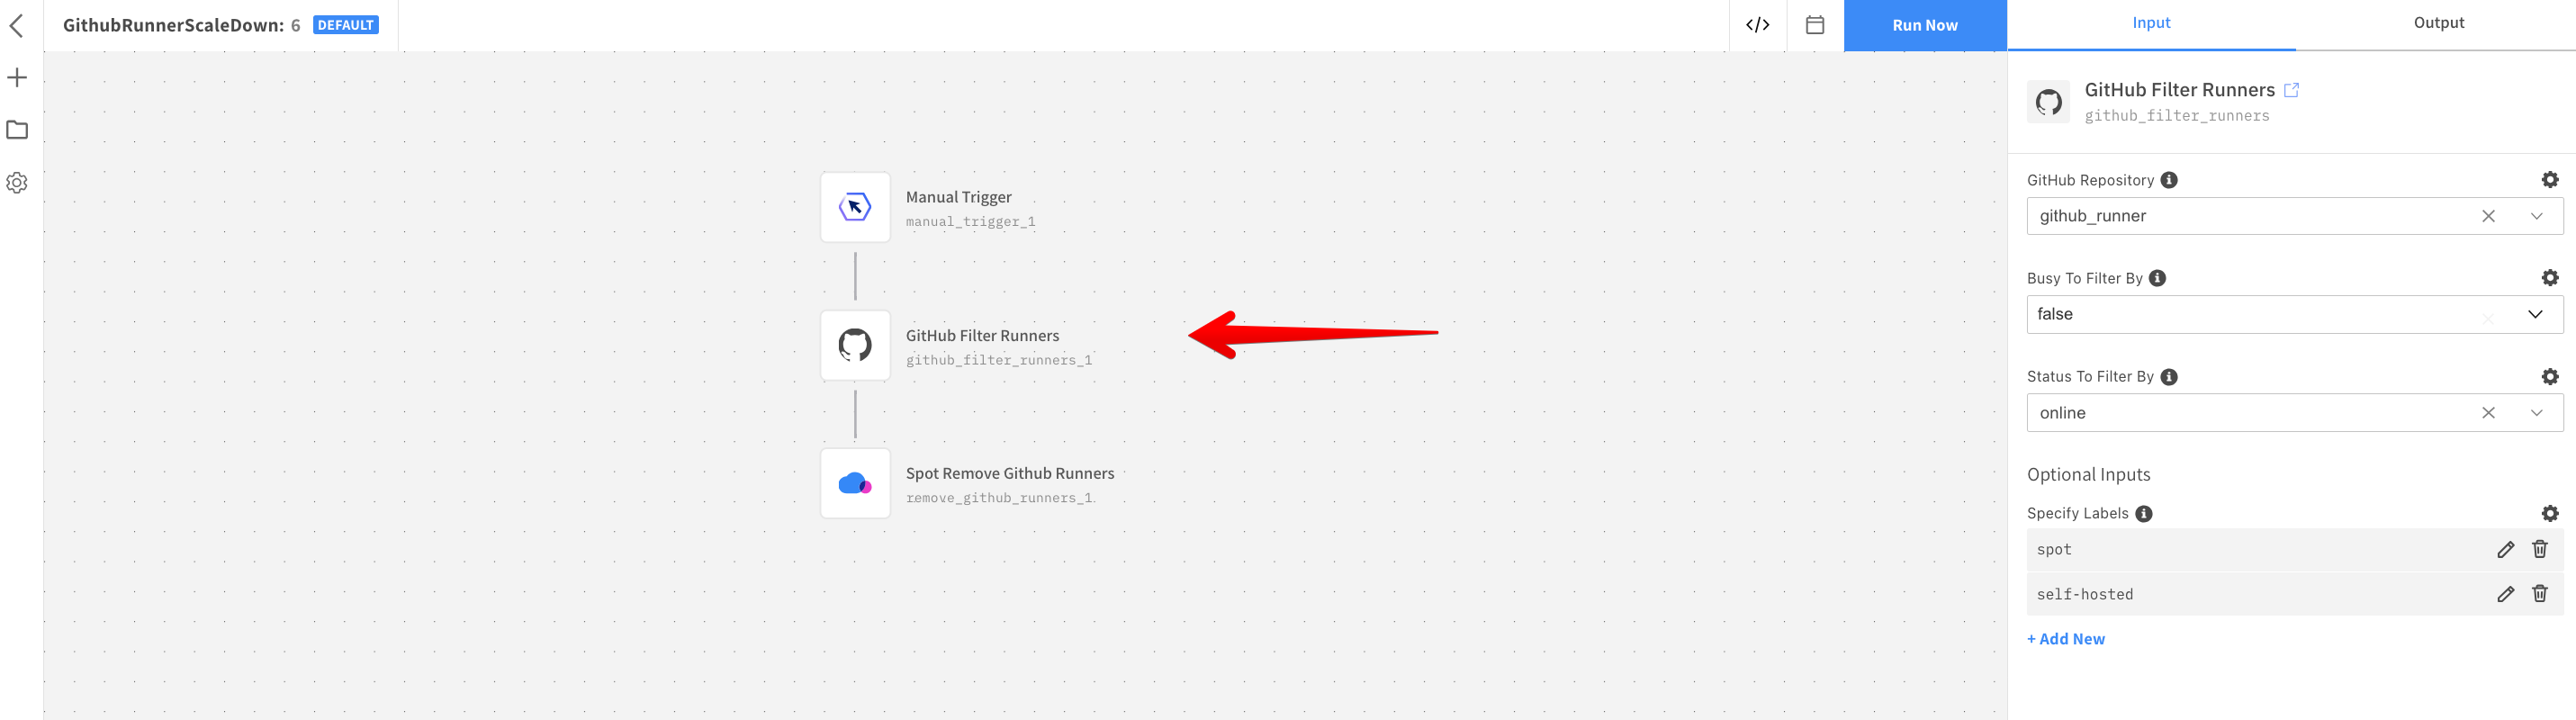
Configure the GitHub Filter Runners resource and select the GitHub repository configured in Step 2, make sure the Busy filter is set to
falseand the Status filter is set toonline. -
Add the Specify labels required by the GitHub workflow jobs. The resource discovers any idle instances matching the labels specified.
-
Configure the Spot Remove GitHub Runners resource, by selecting Spot Instance configured in Step 1 as Spot API Token. Select the GitHub Repository configured in Step 2 and the Spot Account and Elastigroup Id you created in Step 4.
-
Ensure the Terminate Instances flag is set to true with Decrement Target Capacity as
trueand Draining timeout set in seconds (the default is 300). The setting ensures that the scale down flow terminates and decreases all the idle GitHub runners in the group.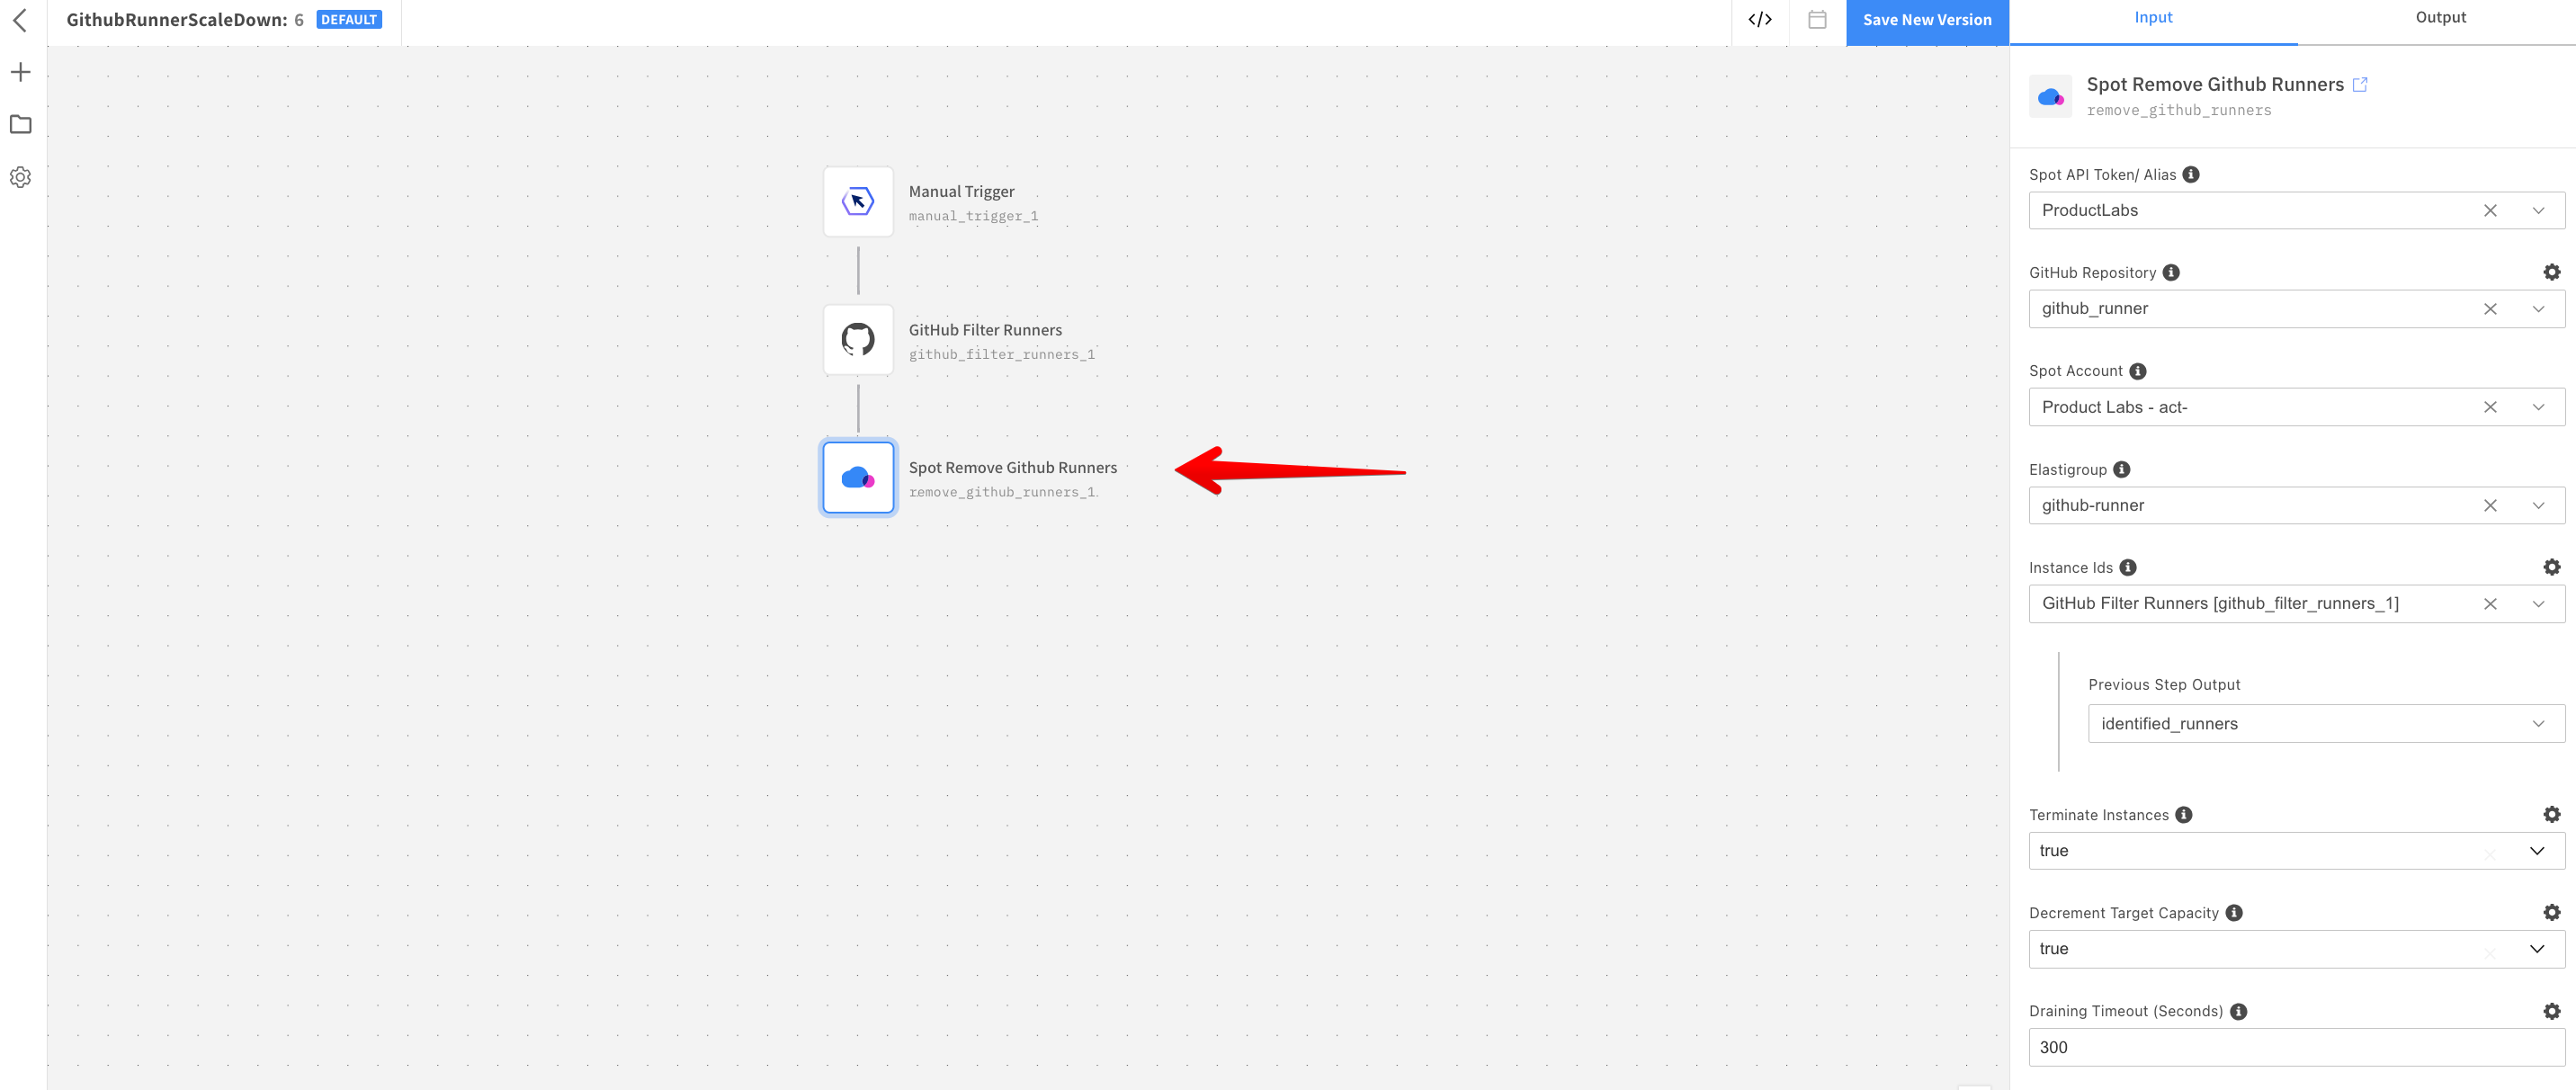
-
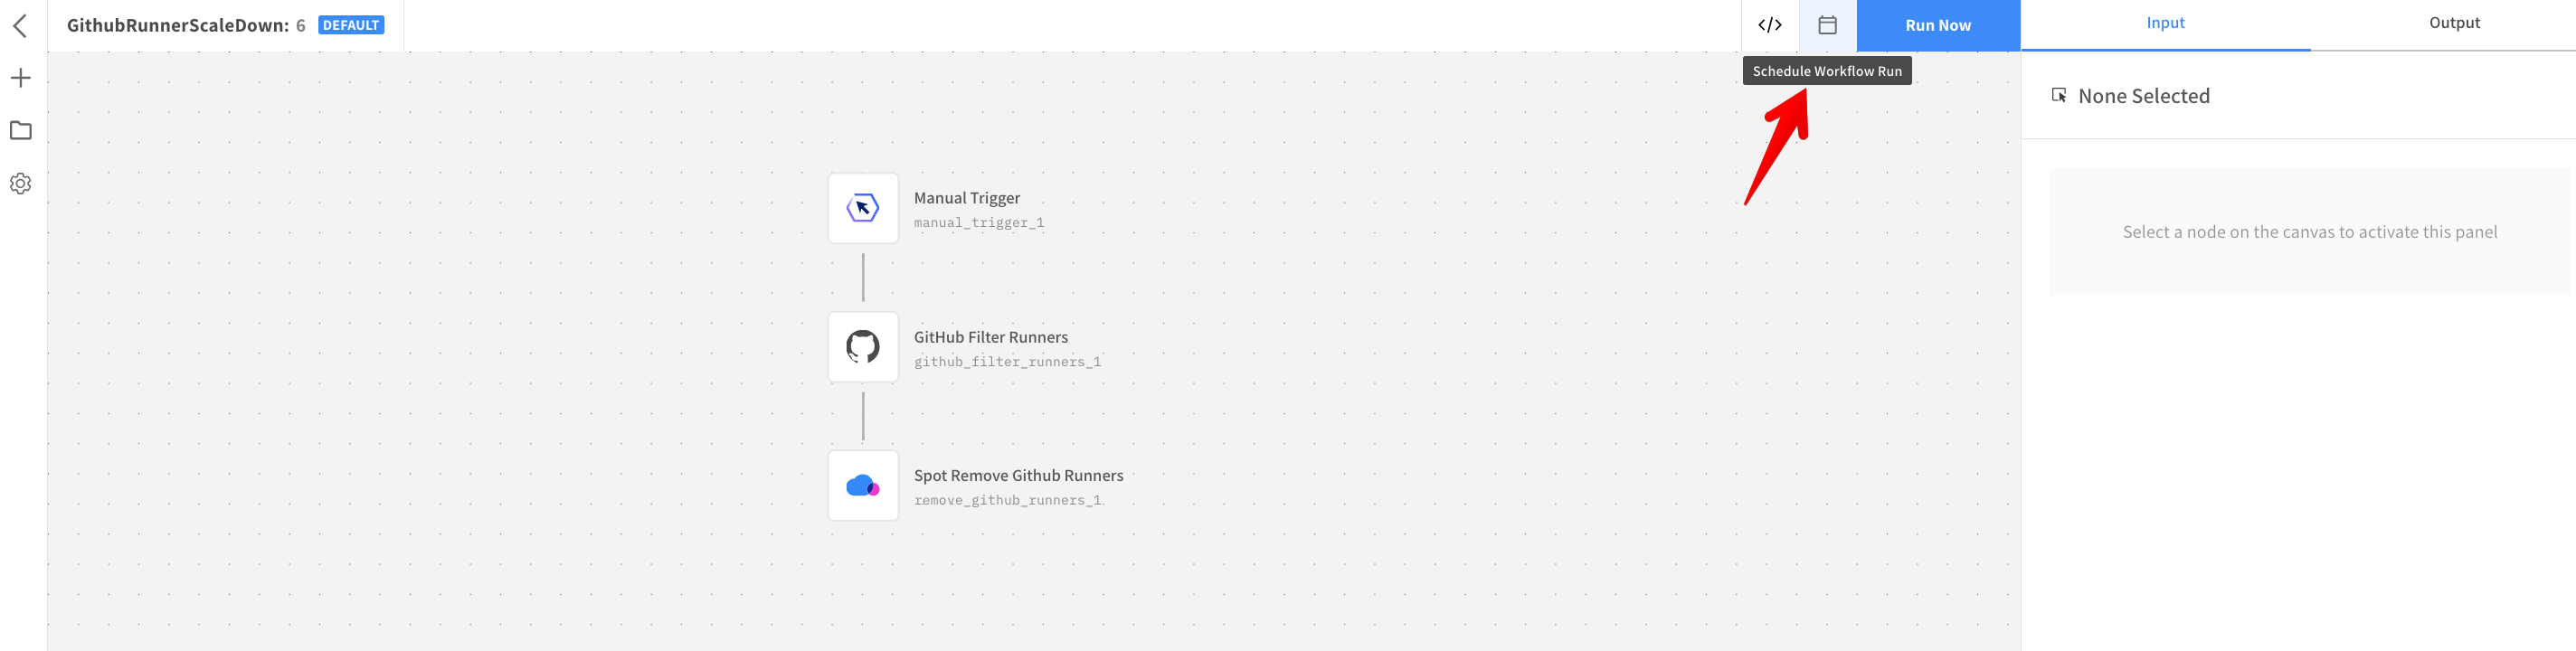
Click the calendar icon to schedule the scale-down flow. You can schedule the scale down flow to run at a fixed interval of time (for example: every 15 minutes) or you can use a Cron expression.
An example of a demo workflow job that runs on the runner with custom label Spot and an inbuilt self-hosted label:
# This is a basic workflow that is manually triggered
name: Sample workflow
# Controls when the action will run. Workflow runs when manually triggered using the UI or API.
on:
  push:
    branches: [ "main" ]
# A workflow run is made up of one or more jobs that can run sequentially or in parallel
jobs:
  # This workflow contains a single job called "greet"
  greet:
    # The type and label of runner that the job will run on
    runs-on: [self-hosted, spot]
    # Steps represent a sequence of tasks that will be executed as part of the job
    steps:
    # Runs a single command using the runners shell
    - name: Send greetings
      run: echo "Hello ${{ github.event.inputs.name }}"
    - run: sleep 300
The configuration is complete, and you can deploy your workflow in GitHub. Spot Connect scales up the Elastigroup runners when the new job is queued and scales down any idle instances based on your scheduled trigger. Ensure the label of Job is the same as the one used in the User data of Elastigroup and the Spot Connect labels configured in GitHub Resource.