Create your First Workflow - Spot Integration
With Spot Connect, you can automatically execute a workflow with actionable results, including Slack notifications, approval policies, and Elastigroup-specific actions like scale up, scale-down, delete a group, and more.
The following procedure is an example of an automatic scale-down action on a budgeted Elastigroup.
Create a Budget for an Elastigroup
Create a budgeted alert in Elastigroup for the automatic scale-down.
-
In the left main menu, click Elastigroup and click Budgets.
-
Click an Elastigroup ID to set a budget.

-
Set the threshold.

-
Set the SNS alert type.

Configure the Integrations
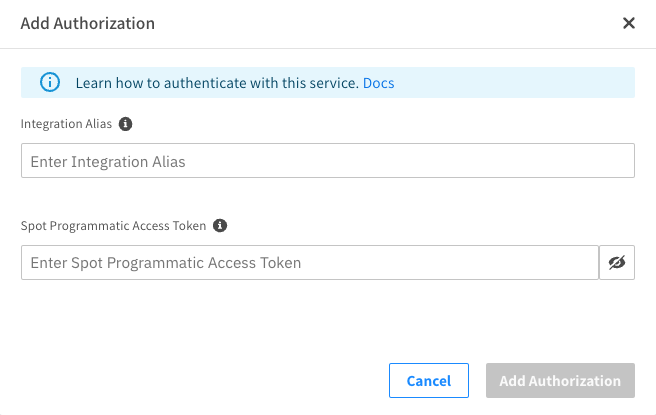
Adding a Spot Programmatic Access Token is required to authenticate and execute Spot Operations in a workflow.
-
In the left main menu, click Connect and Integrations.
-
Under Cloud Services, click Spot by Netapp.
-
Click Add Authorization.
-
Provide an alias for the Spot Token.
-
Enter your Spot Programmatic Access Token. If a Programmatic token is unavailable, you can create a personal token, but a Programmatic Access Token is recommended.
-
Click Add Authorization.
Slack
The Slack integration enables you to send notifications and messages from a workflow to a specific Slack Channel and manage workflow approvals.
-
In the left main menu, click Connect and Integrations.
-
Under Integrations, click Slack.
-
In the top right, click Add integration.

-
Enter an alias for the Slack Workspace.
-
Click Add to Slack.

-
In the top right corner, verify that you selected the correct workspace and click Submit.
If you do not have permission to access the Slack Workspace, you can request to install it, which is sent to the App Manager for approval.
Enable a Slack Channel for Selection
- In the Slack App, right-click the channel and select View Channel Details.
- Click the Integrations tab and click Add a Workflow.
- Search for and add the Spot Connect by NetApp app.
- Verify the app is listed in the integrations.

API Key
API keys are unique to a Spot Organization. The webhook requires an API key to trigger a workflow and send the webhook body payload to the workflow.
- In the left main menu, click Connect and Integrations. Scroll down to Resources.
- Click API keys and click Add New.
- Enter an API Key Name and click Save.
Create the Workflow
Create a workflow using the Spot Elastigroup AWS node.
-
In the left main menu, click Connect and Workflows.
-
Click New Workflow.
-
Enter a suitable workflow name. Workflow names cannot start with “aws”, “amazon”, or “amz”.
-
Select the Generic Webhook trigger type. This enables you to automatically trigger the workflow from any third-party application that supports webhook notifications.
-
Click Create Workflow.

-
In the left panel, click the settings icon.

-
In the Description field, enter a workflow description. A workflow description is required to save and run the workflow.
Configure the Trigger Node
-
Click the Generic Webhook trigger node.

-
From the Webhook API Key Name dropdown menu, select the API Key created above. The webhook URL and required API Key is provided.

-
The API key can be added as a Header or Query Parameter, which is embedded in the URL for usage with AWS SNS Topics.
note- The workflow cannot be saved with the trigger node configured and requires at least one additional node added.
- Since the Generic Webhook trigger is configured, Spot Connect is unaware of which third-party application sends the webhook payload. Therefore, the Output of the trigger node does not show the JSON schema of the webhook. However, it can be copied.
Extract the Elastigroup ID from the Webhook JSON Formatted Alert Body
The JSONPath node provides another way to extract information from a node's output. This workflow is used as a placeholder to save the workflow and verify the webhook body payload after automatically executing the workflow with a webhook trigger.
-
Click + on the left panel and click Core.
-
Drag and drop the JSONPath node onto the canvas.
-
JSONPath node extracts values from keys in JSON arrays and objects.
-
Manually connect the trigger node with the JSONPath node.
-
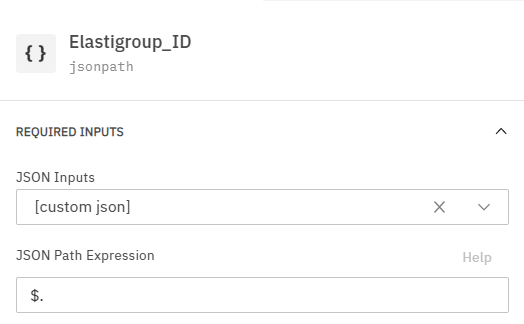
Change the name of the node to a descriptive name. For example: Elastigroup_ID.
-
In the center panel, select the JSONPath node in the node. The JSONPath expression is an expression language to filter JSON Data. The JSONPath window opens.
-
In the JSON Inputs, select the Trigger node from the dropdown menu.

-
In the Previous Step Output field, select output_json.
-
In the JSON Path Expression, set the path as $.Account_ID. The following output is displayed:

This extracts the value from the Account_ID key provided in the webhook body payload.
-
Click Save Workflow to save the new workflow version.
Workflow Execution Alert Body
Set the workflow execution alert body as the output schema for the generic trigger node.
The trigger node output JSON schema is essential for setting values from previous steps in the next nodes in line. The generic webhook trigger node does not provide a JSON schema by default. The output schema can be updated with the alert workflow execution alert body (webhook body).
To update the output schema of the trigger node:
-
Verify the workflow is saved
-
Execute the workflow via the third-party application webhook notification. If you know the webhook JSON formatted payload, you can also use Postman while building your workflow.
-
Select Executions.
-
Select the workflow.
-
Select the Alert Body tab.
-
Click Use as the output schema.
-
Open the Workflow builder.
-
Select the generic webhook trigger node.
-
Select the Output tab in the configuration panel.
-
Click View Outputs.

The JSON schema is provided for the webhook body from your third-party application.
-
Delete the JSONPath node. This is not required in this example workflow.
-
Save the new workflow version.
-
Get the Friendly Name of Elastigroup using the Spot API
The webhook body payload only provides the Elastigroup ID, but we would like to give the familiar name of Elastigroup in the Slack message. Retrieve the Elastigroup configuration details by using the List Elastigroup API call.
-
Click + on the left panel and click Spot by NetApp.
-
Drag and drop the Spot Elastigroup AWS node onto the canvas.
-
Manually connect the Generic Webhook trigger node to the new Spot Elastigroup AWS node.
-
In the right panel, click the Input tab to configure the Spot Elastigroup AWS node.
-
Select the Spot Instance name (API programmatic token).
-
Select the Spot Account. The Spot Accounts available for selection are based on the Spot token selected in the previous step.
-
Select the Spot Operation and select List Elastigroup. The required and optional inputs are displayed.

-
Click the settings icon above the groupID field and select Set value from the previous step.
-
In the groupID field, select Trigger [trigger_1].
-
In the Previous Step Output, select
output. -
Click Configure.
-
Select the key name from the trigger node JSON Schema.
-
Click Save Output.
The value of the Elastigroup_Id will automatically be entered in the groupId field.

-
Save the new workflow version.
Send a Notification to a Slack Channel
The following tutorial describes how to receive a notification in a Slack channel that informs that the budgeted Elastigroup has reached the threshold.
-
Click + on the left panel and click Core.
-
Drag and drop the Slack Send Message node onto the canvas.
-
Manually connect the List Elastigroup node to the new Slack Send Message node.
-
Configure the Slack Send Message by completing the following steps:

-
Select the Slack Instance created above and select the Slack Channel. If your Slack channel does not appear in the dropdown menu, make sure to add the Spot Connect integration to the channel.
-
Click + Add Slack Variables.

-
-
In the Set Slack Variable field, enter the variable name EG-Name.
-
Select the List Elastigroup node and
outputin the Previous Step Output field. -
Select Configure.
-
Select the key name and click Save Output.

-
Click Save Variable.
-
Enter the message in the Message Text Input. Type the variable with double brackets or click Insert variable and select the created variable.
Budget threshold reached for {{EG-Name}} -
Save the new workflow version.
Approval Request
Send an approval notification to the Slack channel, and if approved, automatically scale down the cluster by a set number of nodes.
- Click + on the left panel and click Control Structures.
- Drag and drop the Approval node onto the canvas.
- Manually connect the Slack Send Message node with the new Approval Node.
- Manually add the two paths for approval and denial:
- To create one path, drag and drop the Spot Elastigroup AWS onto the canvas.
- Manually connect the Approval Node with the Spot Elastigroup AWS node.
- Rename the node to “Scale Down Elastigroup.”
- Use this path for approval.
- To create the other path, drag and drop the Spot Elastigroup AWS onto the canvas.
- Manually connect the Approval Node with the Spot Elastigroup AWS node.
Configure the Approval Node
-
Select the Slack Instance created earlier.
-
Select the Slack Channel. If your Slack channel does not appear in the dropdown menu, make sure to add the Spot Connect integration to the channel.
-
In the Slack App, right-click the channel and select View Channel Details.
-
Select the Integrations tab and click Add apps.
-
Search for and add the Spot Connect app.
-
Verify the app is listed in the integrations and enter notes to the reviewer.
-
Set the Interval before triggering a timeout.
- For approved, select the node Spot Elastigroup AWS #2.
- For denied, select the node Stop #1.

Scale Down the Elastigroup Cluster
If you approved the flow in Slack, configure the scale down of the Elastigroup that reached the budget threshold.
Configure the Scale Down Elastigroup Node
-
Select the Spot Instance name (API programmatic token).
-
Select the Spot Account. The Spot Accounts available for selection are based on the Spot token selected in the previous step.
-
Select the Spot Operation.
-
Select Scale Down. The required and optional inputs are displayed.
-
Click the settings icon above the groupID field and select the Configuration gear.
-
Select Set value from the previous step.
-
Select Trigger [trigger_1].
-
In the Previous Step Output field, select
output. -
Click Configure.
-
Select Elastigroup_Id from the trigger node JSON Schema.
-
Click Save Output. The value of the Elastigroup_Id will be automatically entered in the groupId field.
-
In the adjustment field, set the number of nodes by which you want to scale the Elastigroup.

-
Click Save Workflow to save the new workflow version.
Run the Workflow using Webhook
Open your API platform. The following procedure is an example that uses Postman. You can use any other third-party application that supports webhook notifications.
Configure Postman
-
Log in to Postman and create a new HTTP Request.
-
Select the Generic webhook trigger node.
-
Copy the Workflow Webhook URL
-
In Postman, paste the webhook URL in the request URL.
-
Select the Generic webhook trigger node and copy the Webhook API Key Value.
-
Under the Header tab (in Postman), paste the SPI Key Value in “x-api-key”.
-
Under the Body tab, select raw, and change the format to JSON.
-
Enter the relevant data from your Elastigroup with the following JSON Schema:
{
  "Organization_Name": "SpotOrgname",
  "Account_Name": "SpotAccountname",
  "Account_ID": "act-29ddd123",
  "MTD_Spend": "3.8",
  "Budget": "4.0",
  "Elastigroup_Id": "sig-e26f1234"
} -
Click Send.
Run the Workflow Using the Spot Console
-
Log in to the Spot Console and in the left main menu, click Connect.
-
Select Executions. The page displays all execution history logs for the last 30 days.
-
Select the latest workflow execution with the status In Progress.

- Each step is shown with the description of the status as completed successfully, failed, or waiting.
- Each step can be selected and reviewed.
Approve the Workflow using Slack
-
Open the select Slack Channel to review the Slack message and approval.

-
Click Approve for the workflow to continue with scaling down the identified Elastigroup.
View Executions
You can view the executions you created in the Execution Detail page after you have successfully run your workflow.
In the left main menu, click Connect and Executions. This page gives a general overview of an execution. You can review each step individually by clicking on the step.

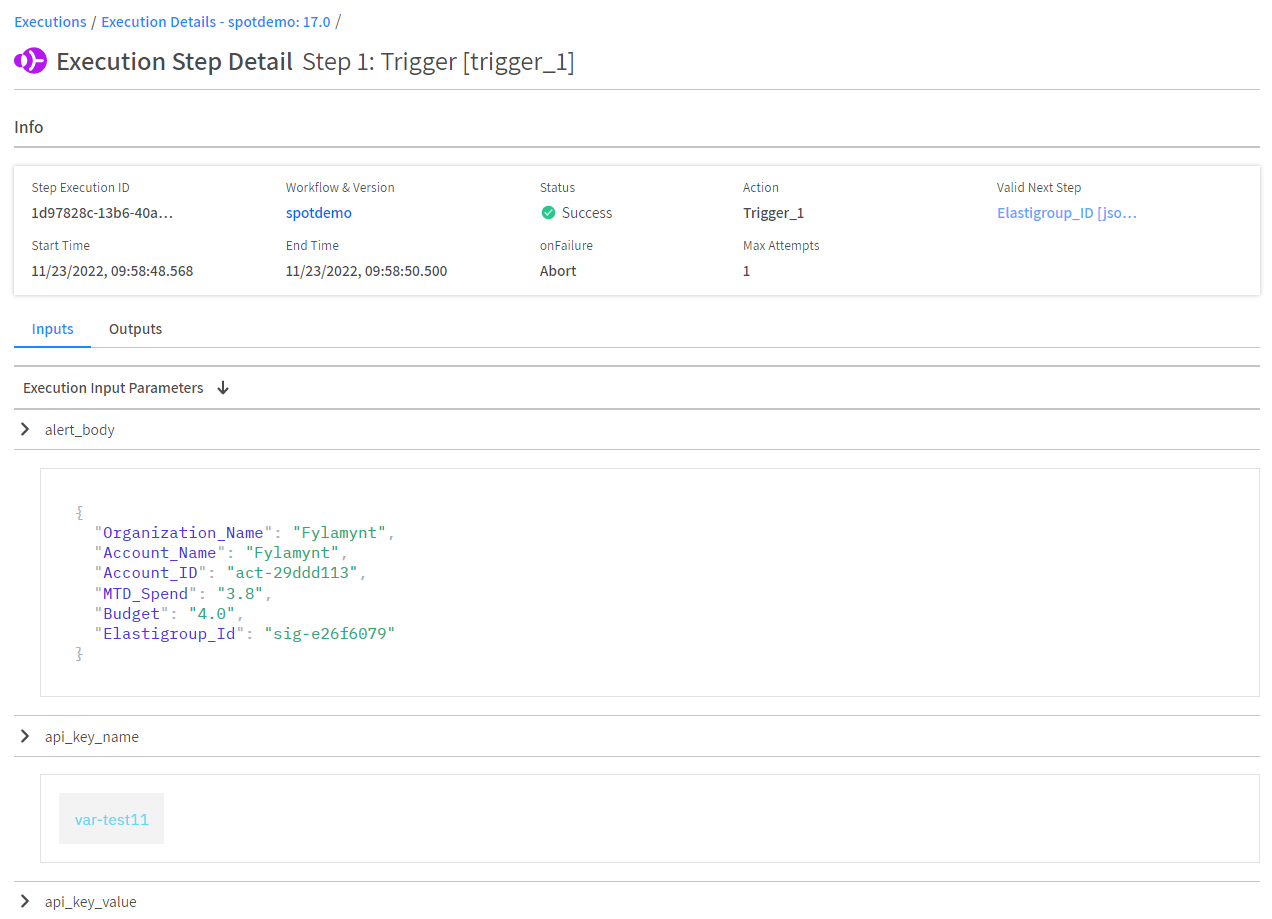
Click a step ID to view the details of that step. You can view the input and output information by clicking the relevant tab.


Learn how to create your first workflow with AWS.