Create your first workflow - AWS Integration
You can shut down an EC2 instance with a specific name. The following procedure is an example of creating a workflow that shuts down an EC2 instance.
Configure the Integrations
Use the integration to execute AWS API calls in Spot Connect workflows.
-
In the left main menu, click Connect and Integrations.
-
Under Cloud Services, click AWS.
-
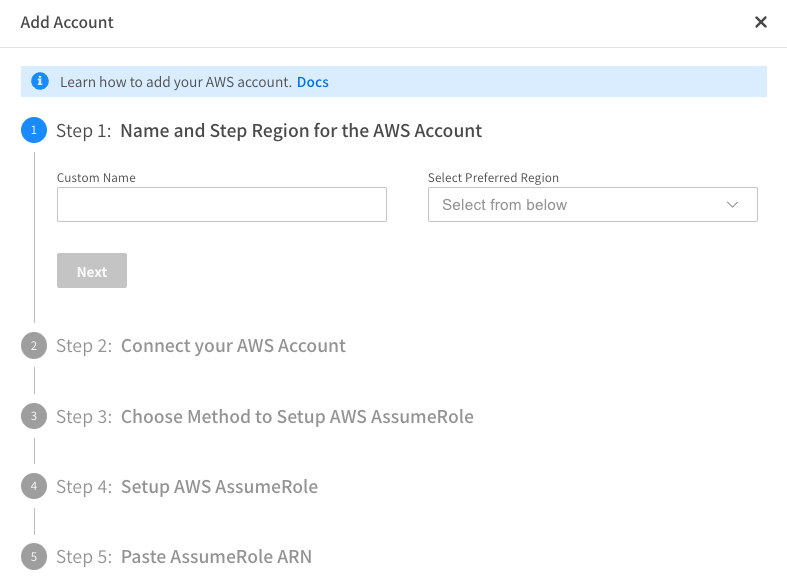
Click Add Account.
-
Enter the Custom Name for the AWS account
-
Set the Preferred Region and click Next.
-
Click Log in to AWS Account. The AWS console opens. Log in to your account.
-
Click Run Template. The Quick create stack window opens. This is the CloudFormation template to create a stack.
-
In the Stack name field, enter the Stack name. This is required.
-
Verify the PolicySelection input field.
-
You can specify a custom AWS Security Policy for the AWS account. If you already have a policy, copy and paste the ARN.
For non-critical test accounts, the PowerUserAccess managed policy is set by default. This unlocks the full functionality of the Spot Connect platform.
- The Spot Connect Account ID and External ID fields are automatically entered and can be left in their default state.
- AWS CloudFormation may create IAM resources.
-
Click Create stack.
-
Wait for the stack creation to complete. When it is complete, select the output tab and copy the value of the AssumeRoleArn Key.
-
Go back to the Spot Connect console and click Next.
-
Paste the value of the AssumeRoleArn copied from the output of the stack and click Add Account.
Create the Workflow
Create the workflow using the AWS node.
-
Click + on the left panel and click Core.
-
Drag and drop the JSONPath node onto the canvas.
-
In the left main menu, click Connect and Workflows.
-
Click New Workflow.
-
Enter a workflow name. Workflow names cannot start with “aws”, “amazon”, or “amz”.
-
Select Manual and click Create Workflow.
-
In the left panel, click the settings icon.

-
In the Description field, enter a workflow description.
-
Find the AWS EC2 instance with a specific name by completing the following steps:
- Click + on the left panel and click Core.
- Drag and drop the AWS node onto the canvas.
- Manually connect the Manual Trigger node with the AWS node.
- Hover over the AWS node, click the edit icon and change the name of the AWS node to: Describe EC2 Instance.
Configure the Describe EC2 Instance Node
- Select the AWS node, and the input configuration panel opens.
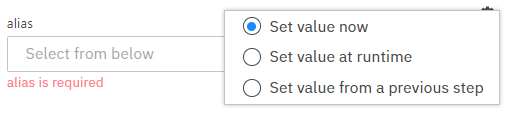
- Above the alias field, click the settings icon and select Set value now.
- From the alias dropdown menu, select the AWS integration alias created above.
- Above the region_name field, click the settings icon and select Set value now.
- From the region-name dropdown menu, select the region.
- In the Service field, select AWS Service.
- In the Operation field, select DescribeInstances. The following fields open: Optional, Name, and Value.
- In the Optional field, click + Add Filters.
- In the Name field, enter tag:Name and click Add Value.
- In the value field, enter the name of the EC2 instance you want to stop and click Save.
- Click Save Workflow at the top to save the new workflow version.
Shutdown the EC2 Instance
- Click + on the left panel and click Core.
- Drag and drop the AWS node onto the canvas.
- Manually connect the previous Describe EC2 Instance AWS node with the new AWS node.
- Change the name of the new AWS node to: Shutdown EC2 Instance.
Configure the Shutdown EC2 Instance node
-
Select the AWS node, and the input configuration panel opens.
-
Above the alias field, click the settings icon and select Set value now.
-
From the dropdown menu, select the AWS integration alias created above.
-
Above the region_name field, click the settings icon and select Set value now.
-
From the region-name dropdown menu, select the region.
-
In the Service field, select the AWS Service.
-
In the Operation field, select StopInstances.
-
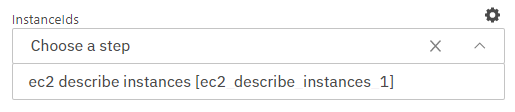
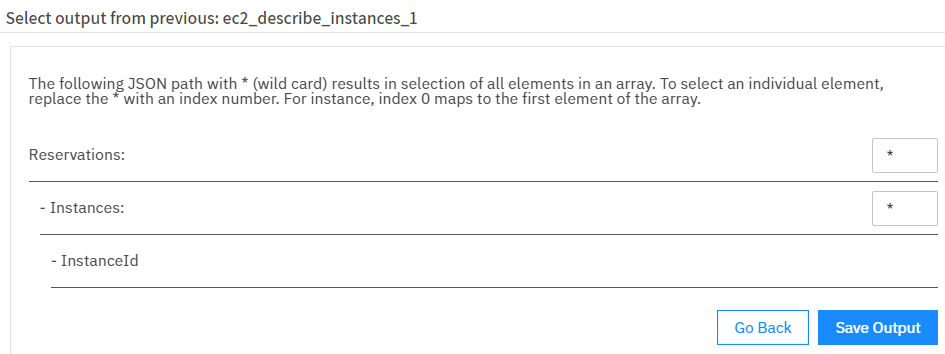
Above the InstanceIds field, click the settings icon and select Set value from the previous step.
-
Select the Describe EC2 instance node from the dropdown menu.
-
From the dropdown menu in the Previous step Output, select output.
-
In the output, click Configure, that opens a modal with the JSON Schema of the response output of the EC2 described action.
-
Select InstanceId.
-
Click Save Output.
-
Click Save Workflow at the top to save the new workflow version.
Manually Run the Workflow
You can manually run the workflow that you constructed in the steps above.
-
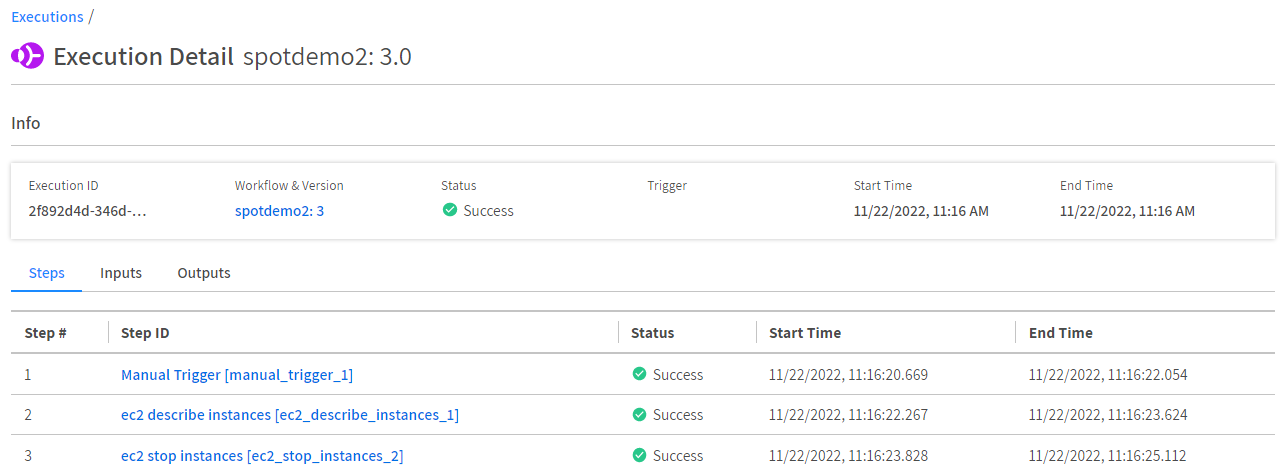
In the workflow builder, click Run Now. A new browser opens that displays the execution steps of the workflow.
-
Refresh the browser to see the updated step statuses.
View Executions
You can view the executions you created in the Execution Detail page after you have successfully run your workflow.
In the left main menu, click Connect and Executions. This page gives a general overview of an execution. You can review each step individually by clicking on the step.

Confirm Shutdown
After the execution of the workflow, you can view the status of your EC2 instance in the AWS console to see that it has shut down. You can see that the EC2 instance with the name “demo-spotconnect” state changed to Stopped.
