Connect AWS
This page describes the procedures for automatically and manually connecting your AWS account to Spot. You can also customize your account by selecting permissions for specific Spot products and integrations with AWS.
After signing up for Spot and creating your first Spot organization, you need to connect your Spot account to your AWS account. The following procedure describes how to connect a linked account.
You can connect your account to AWS in two ways:
- Connect manually
- Connect automatically
Connect Manually
Step 1.1: Connect Manually
-
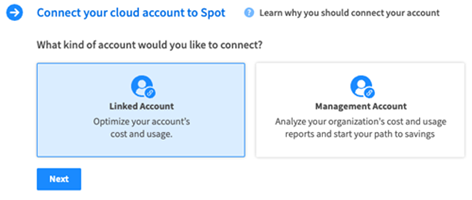
After you have selected AWS as the cloud provider, select Linked Account.
-
Select Manually.
Step 1.2: GovCloud or China Account?
Mark the relevant answer and click Next.
If you are connected to an AWS GovCloud or China account, you will not be able to customize your policy.
Step 1.3: AWS Login
Log in to the AWS account that you want to connect to your Spot account and click Next.
Step 1.4: Customize or Default Permissions
Select between the two options:
-
Customize Permissions: Select specific products and/or integrations you want to enable in your account. Each product or integration contains a list of actions that are required for it to operate in the console.
-
Default Permissions: Provides the default IAM Policy. If you select the default Permissions, continue to step 1.6.
Step 1.5: Customize Permissions
When you connect your cloud account to Spot automatically or manually, you can select permissions for specific Spot products and integrations with AWS. Mark a checkbox to select a product/s and mark the checkboxes of the integrations of the specific product.
Expand each integration to view the actions under it.
If a permission bundle is not selected, the list of permissions under it won’t be included in the policy JSON.
Click View JSON to view the permissions in the JSON preview that is updated according to your selection.
Step 1.6 Create IAM Policy
In this step you create the policy that the Spot role will use to manage resources in your AWS account. Complete this step in the order of the instructions in the wizard.
-
In AWS, go to the IAM dashboard. In the sidebar on the left, click Policies.
-
In the Policies page that opens, click Create Policy.
-
In the Visual Editor page that opens, click the JSON tab.
-
In the Spot console, in the connection wizard, click View JSON at the bottom.
-
When the policy opens in the Spot console, click the copy icon in the top right.
-
Switch back to the JSON tab in AWS, paste in the policy over any text that was there, and click Next.
-
In the Review Policy page in the AWS console, add the name Spot-Policy for the policy and then click Create Policy.
-
In the wizard in the Spot console, click Next.
-
Create the IAM role by completing the steps in the order of the instructions in the wizard.
-
Paste the RoleArn from the role’s page and paste it in the field and click Connect.
-
The success message below indicates that your AWS account is linked to Spot.
Connect Automatically
Step 1.1: Connect Automatically
After you have selected AWS as the cloud provider, select Linked Account. Select Automatically.
Step 1.2: GovCloud or China Account?
Mark the relevant answer and click Next.
If you are connected to an AWS GovCloud or China account, you will not be able to customize your policy.
Step 1.3: AWS Login
Log in to the AWS account that you want to connect to your Spot account and click Next.
Step 1.4: Customize or Default Permissions
Select between the two options:
- Customize Permissions: Select specific products and/or integrations you want to enable in your account. Each product or integration contains a list of actions that are required for it to operate in the console. For the full description of the settings, click here.
- Default Permissions: Provides the default IAM Policy. Continue to step 1.5.
Step 1.5: Run IAM Template
The IAM Policy is created in the AWS console. Click Run IAM Template to generate the IAM policy.
-
In the AWS console, click the Capabilities tab, mark ‘I acknowledge that AWS CloudFormation might create IAM resources’.
-
Click Create stack and return to the Spot console.
-
This step can take a few minutes. When the stack is successfully created, a message will open and you will be redirected to the new account in the Spot Console.
Edit Policy Option
To edit the policy after the account has been created, you need to update the policy directly in AWS. You can edit the policy after it has been created in the AWS console.
-
In AWS, go to the IAM dashboard. In the sidebar on the left, click Policies.
-
Enter the policy you want to edit. You can search for a policy in the search bar. Enter the
spotinst-iam-stackprefix in the search bar to find your policy. -
Select the policy and click Edit. You can edit directly in the JSON policy editor.
-
Click Next.
Permissions Page
This page displays the permissions and you can review them. If you approve the changes, click Save changes and your policy will successfully be updated.