Migrate Workload Using the Console
This page describes how to migrate existing Kubernetes workloads into an Ocean cluster.
Before you start this procedure, review the prerequisites.
Step 1: Get Started with Workload Migration
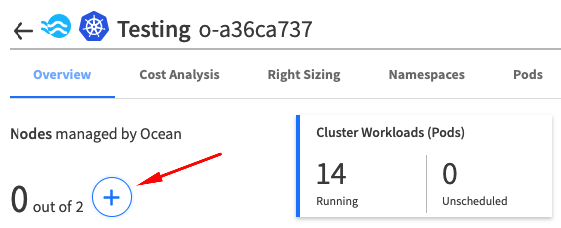
After you have successfully completed creating your Ocean cluster, click the plus sign under Nodes managed by Ocean.
Step 2: Select Instances to Migrate
Ocean automatically detects the workloads (nodes and pods) that belong to the Kubernetes cluster associated with it.
In the following window, Ocean will display all the nodes that it discovered.
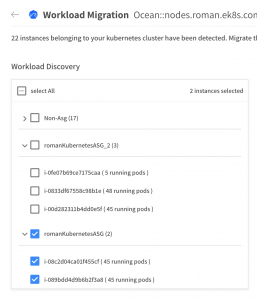
From the list on the left, choose the instances you want to migrate into your Ocean cluster by marking the checkboxes.
Step 3: Set Preferences
Choose your preferred Workload Migration process by selecting the relevant checkbox:
- Terminate Instances – Ocean terminates the old instances once the pods that reside in them are migrated, and the old instances are fully drained.
- Evict stand-alone Pods – Ocean terminates pods that do not belong to a Kubernetes deployment. This means that you need to launch the pod manually (after the migration) because there is no object that can launch it automatically.
- Force PDB covered Pod Eviction – By selecting this checkbox, Ocean forces the Pod eviction from the instance, even if the distributed budget is not satisfied.
If you have Stand-Alone pods, and you have not chosen Evict stand-alone Pods, you will be required to manually evict those pods at the end of the migration process.
Step 4: Start Migration
-
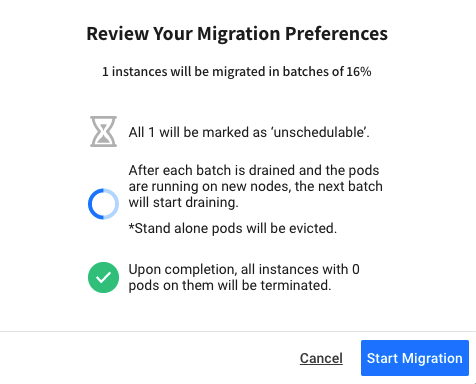
After you have chosen the relevant instances and decided on the migration scope and batch size, click Start Migration in the bottom right corner. A window displays a final review of the migration configuration.
-
Click Start Migration to begin the migration process.
Once you have started the migration, you will have the option to stop it. However, workloads that have been migrated to Spot remain under the new instances that are managed by Spot. This means that when stopping the process, Spot finishes scheduling all unscheduled pods of the current batch, and instances that were not drained yet become schedulable again.
Step 5: View Workload Migration Dashboard
During the migration, you have visibility into the process in the Workload Migration Dashboard.
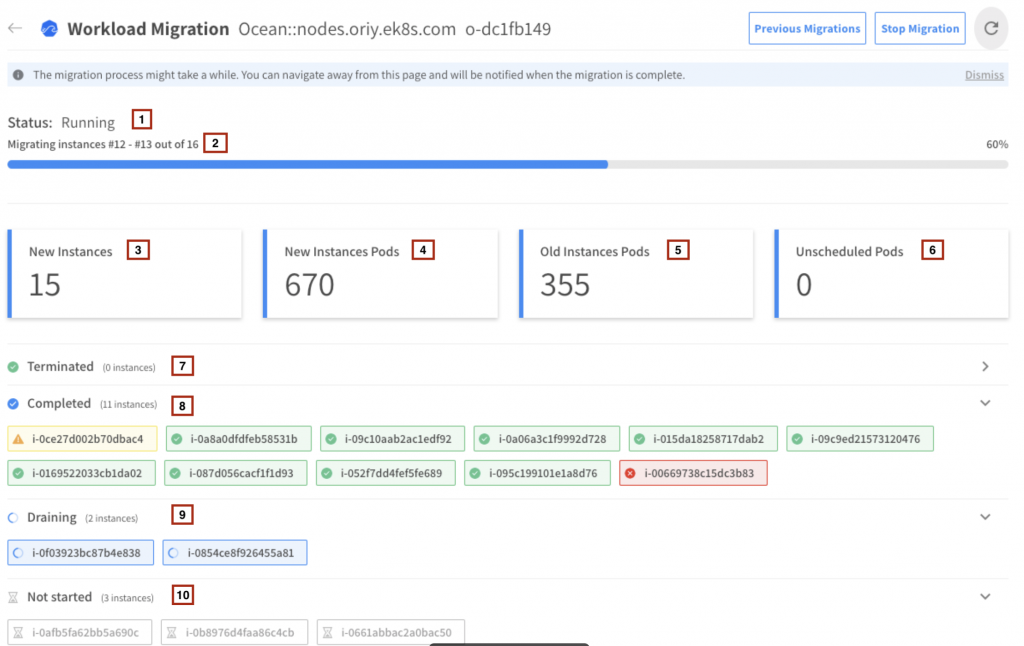
The following information is displayed:
- The overall status of the migration process:
- Running – The migration process is concurrent and pods are being migrated.
- Stopping – The migration process has been interrupted by the user, and Spot is gracefully completing the current batch.
- Stopped – The migration process has officially stopped, after completing the stopping phase.
- Completed – The migration process has completed successfully.
- Failed – The migration process has failed due to technical fault during the process.
- The stage of the migration process.
- The number of new instances spun up by Spot. This number increases from 0 during the first few minutes of the migration process.
- The number of pods launched on new instances. This number increases as the migration proceeds. Note that Kubernetes might schedule other pods that do not belong to the workloads being migrated.
- The number of pods remaining to be launched by Spot. This number decreases to 0 during the migration process.
- The number of unscheduled pods in the cluster. The number of pods that are currently in an unscheduled state. Spot refers only to unscheduled pods that are a part of the workload.
- The instances that have been terminated successfully.
- The instances that have completed the migration successfully.
- The instances that are currently being drained.
- The instances that have not started the migration process.
Instance Color Status
- Green: The instance has completed the migration successfully.
- Yellow: The instance has partially completed the migration.
- Red: The instance has failed the migration.
If you want to review previous migrations, click Previous Migrations on the top right corner of the Workload Migration screen.
Stop Migration
You have the option to stop the migration process once it has started.
- Click Stop Migration.
- Mark Terminate Drained Instances if you want Ocean to terminate the already drained instances before stopping the entire process.
- Click Yes.
- Click Stop.