Manage Virtual Node Groups
Cloud service provider relevance: AWS Kubernetes, GKE
Virtual Node Groups (VNGs) provide a single layer of abstraction that enables you to manage different types of workloads on the same cluster.
This topic describes how to create, view, edit, and delete virtual node groups in Ocean.
Prerequisites: An up and running Ocean cluster.
Create a Virtual Node Group
Create a virtual node group from scratch.
-
In the console, go to Ocean > Cloud Clusters and click the Ocean cluster where you want to add a virtual node group.
-
Click the Virtual Node Groups tab.

-
Click Create New Virtual Node Group.

-
Click Configure Manually or select to import from an existing Autoscaling Group (AWS) or Node Pool (GKE).
-
Click Continue.
When you choose Import, a one-time process occurs. Import copies values from the cloud provider node group entity to the Ocean configuration. Later, there is no active connection between these two entities. Ocean will provision new VMs, not as part of a managed Kubernetes service of node group entities.
New Virtual Node Group Tab
- In the New Virtual Node Group tab, enter the parameters you want to customize. Parameters that are left blank use values from the default virtual node group.
- When you have finished customization, click Save.

Configuration Parameters
- Name: The name you assign to the virtual node group.
- Image: The Amazon machine image (AMI) used for the virtual node group.
- Security Groups: The security groups that apply to the virtual node group. You can select up to 5 groups as per the AWS limitation.
- Subnets: The subnets that apply to the virtual node group. You can select multiple subnets.
- Root Volume Size (
rootVolumeSize): The root volume size in GiB.rootVolumeSizeandblockDeviceMappingscannot be used in the same virtual node group. - Instance Profile: The
iamRoleobject applicable to the instance profile. - User Data (Startup Script): The user data script to be set in Base64-encoded MIME.
Node Selection Parameters
This section enables you to inform Ocean about the labels and taints that are set on the nodes. When they are set, Ocean will use them to select the right virtual node group for a pending pod.
- Node Labels: Key/Value pairs defined on the Kubernetes nodes.
- Node Taints: Triplets of Key, Value, and Effect defined on the Kubernetes nodes.
You must enter custom labels in both the virtual node group Node Selection configuration and in the virtual node group User Data (Startup Script) configuration for the labels to take full effect. For Kubernetes user data, see Create Custom Labels.
Advanced Parameters
- Maximum Nodes: The maximum number of instances allowed in this virtual node group during scaling operations.
- Block Device Mapping (
blockDeviceMappings): Block devices that are exposed to the instance. You can specify virtual devices and EBS volumes.blockDeviceMappingsandrootVolumeSizeare mutually exclusive - you cannot use both in the same virtual node group configuration. - Tags: Key and Value pairs used to apply tags on the EC2 machine. Specific tags can be applied per virtual node group.
- Headroom: Spare resource capacity management enabling fast assignment of Pods without waiting for new resources to launch.
- Reserve: The number of units to retain as headroom, where each unit has the defined headroom CPU and memory.
- CPU (millicpu): Optionally configure the number of CPUs to allocate to the headroom. CPUs are denoted in millicores, where 1000 millicores = 1 vCPU.
- Memory (MiB): Optionally configure the amount of memory (MiB) to allocate to the headroom.
- GPUs: Optionally configure the number of GPUs to allocate for headroom unit.
Example: GPU Instance
If a pod requires a GPU instance, add the relevant GPU image to a virtual node group. Ocean will spin up instances accordingly. Specific labels are not required in this case. Example:
resources:
  limits:
    nvidia.com/gpu: 1
You can use a node selector or node affinity that requires your GPU-based pods to select the specific VNG containing the GPU image, based on the custom node label configured in the GPU virtual node group.
Select Instance Types for each Virtual Node Group
To select spot instance types for a specific virtual node group:
-
Go to Clusters in the left menu and click the name of the relevant cluster.
-
Click the Virtual Node Groups tab, and click the name of the relevant virtual node group from the list.

-
In the Virtual Node Groups tab, scroll down until you see Instance Types and click Customize Instance Types.

-
Complete the Instance Types configuration (described in the subsections below) and then click Save.
Configure Instance Types
The instance types shown in the default virtual node group are only the instance types supported in the region that the cluster is configured in.
In the custom virtual node groups, Ocean automatically filters out instance types that are not selected in the default virtual node group and instance types that do not meet the AMI architecture of the custom virtual node group.

- Click an arrow to see the available instance options.
- Deselect the available options, as needed.
The instance types that are grayed out are not enabled for the following reasons:
- Do not exist in the default virtual node group.
- Do not fit the AMI architecture.
When you hover over the instance type, a tooltip shows the reason.
Use the Sliders
Instead of deselecting individual instances, you can use the vCPU, memory, or GPU sliders. When you move a slider, the instance types that are out of the range are automatically deselected.

The Instance Types Selected counter above the sliders displays your current selection count. This counter updates automatically as you adjust sliders or modify individual instance selections. Similar selection indicators appear in each instance type category.
Restore to Default
To restore the instance types in a virtual node group to the default configuration, click Restore to Default. This behaves as follows:
- For a Custom virtual node group: The instance types are set to all the instance types that are available in the Default virtual node group.
- For Default virtual node group: The instance types are set to the default Ocean configuration, which means that all instance types are available. Then Ocean can choose any combination of instance types that best fit the workload requirements.
Note that when you update the default virtual node group instance types, Ocean actually updates the Ocean cluster types since these have the same configuration.

Create a VNG from an ASG
This procedure describes how to create a virtual node group in an Ocean cluster using the configuration from an existing Amazon autoscaling group. This process is referred to as importing a virtual node group from an ASG.
- In the console, go to Ocean > Cloud Clusters and click the cluster name you want to add a VNG to.
- In the cluster summary, click the Virtual Node Groups tab.
- Click Create New Virtual Node Group.
- Select Import configurations from an Autoscaling Group, choose the autoscaling group from the dropdown list, and click Continue.

- When the New Virtual Node Group appears, you will see the fields filled with the values from the selected Autoscaling Group. Review and update as necessary.
- When you are finished, click Save.
View VNGs
Ocean provides a dashboard that enables you to track live data for each virtual node group. You can review the resource allocation, number of nodes and pods running, and other information about the virtual node groups.
-
In the console, go to Ocean > Cloud Clusters and click the cluster where you want to view virtual node groups.
-
Click the Virtual Node Groups tab to display a summary of all virtual node groups in the Ocean cluster.

Virtual Node Group Summary Table
The virtual node group summary table contains these columns:
- ID: The identification code of the virtual node group.
- Name: The user-defined name of the virtual node group. (If a virtual node group was defined without a name, it will appear in this column as Unnamed Virtual Node Group.)
- Resource Allocation: Percent of defined resources (CPU, Memory, and GPU) used by the virtual node group.
- Running Pods: Number of pods the virtual node group uses.
- Nodes: Number of nodes the virtual node group uses.
- Node Labels: Number of node labels the virtual node group uses.
- Node Taints: Number of taints the virtual node group uses.
- Tags: Number of tags the virtual node group uses.
- Max Nodes: The maximum number of nodes defined for the virtual node group.
-
You can change the sort order in the table by clicking on the column headings.
-
To select which columns to display in the table, click the three dots on the right.

-
Use the search box to filter items in the table or search for a specific virtual node group.
-
To review/edit the configuration details for a virtual node group, click on its name in the table.
Edit the Virtual Node Group in JSON Format
You can also review and edit virtual node group configurations directly in JSON format. This method provides more flexibility and access to virtual node group features that are supported in the Spot API but may not yet be available in the console interface.
-
Go to the Virtual Node Groups tab and click on the virtual node group name.
-
Click JSON in the upper right corner.
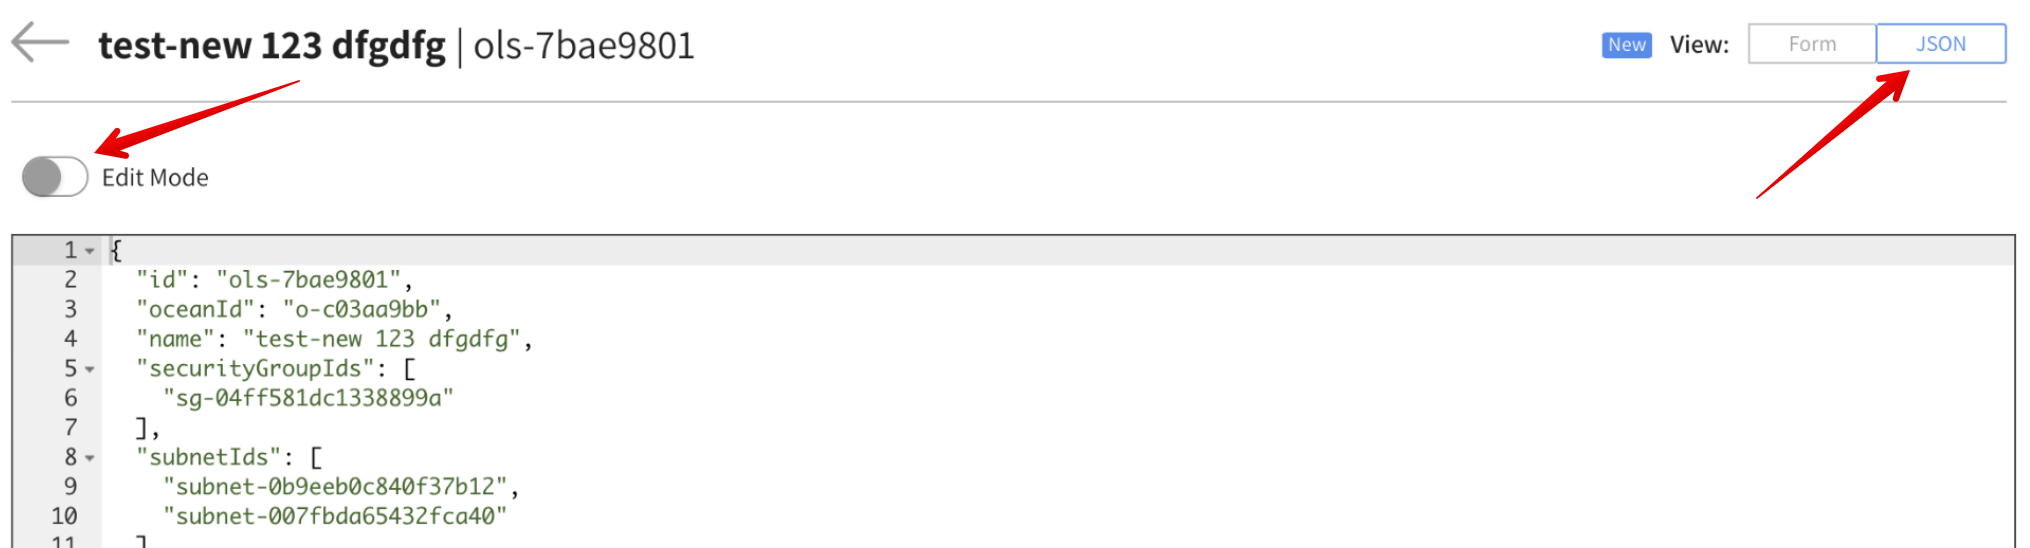
This displays the complete JSON configuration for the virtual node group. To modify the configuration, click Edit Mode, make your changes, and click Save.
Delete a Virtual Node Group
To delete one or more virtual node groups in the Virtual Node Groups tab:
- In the summary table, select the virtual node groups to delete,
- Click Delete.
Otherwise, if you are already in the virtual node group configuration area, click Delete VNG at the bottom.