Hive Metastore
Configuring a Hive Metastore makes your table metadata persistent across your Apache Spark applications and enables the sharing of Spark tables across multiple Spark infrastructures.
We recommend the Hive local mode in which the Spark driver of your application communicates directly to a remote database, as it is easy to set up and does not require any maintenance.
The first section below explains how to create a Hive Metastore database. If you already have one, you can skip to the next section, Connect to a Hive Metastore.
Create a Hive Metastore Database
To create a Hive Metastore database, complete the following procedures:
- Create a database service
- Configure Connectivity
- Create the database
- Create the Hive schema
These steps are described below.
Create a Database Service
In this step, you will create a database service in your cloud provider.
On AWS, RDS allows you to create managed services for Aurora, MySQL, MariaDB, PostgreSQL, Oracle, and Microsoft SQL Server. You should consider availability, backups, security, and maintenance in this choice.
This document provides an example assuming an RDS running PostgreSQL. Pleas see the relevant AWS instructions.
Configure Connectivity
In this step, you ensure the database can be accessed by your Ocean Spark applications.
One way to ensure connectivity is to create an inbound rule for TCP on port 5432 and to configure the database to be publicly accessible.
Inbound rule
Go to the VPC security group of the database service and create an inbound rule similar to the following:

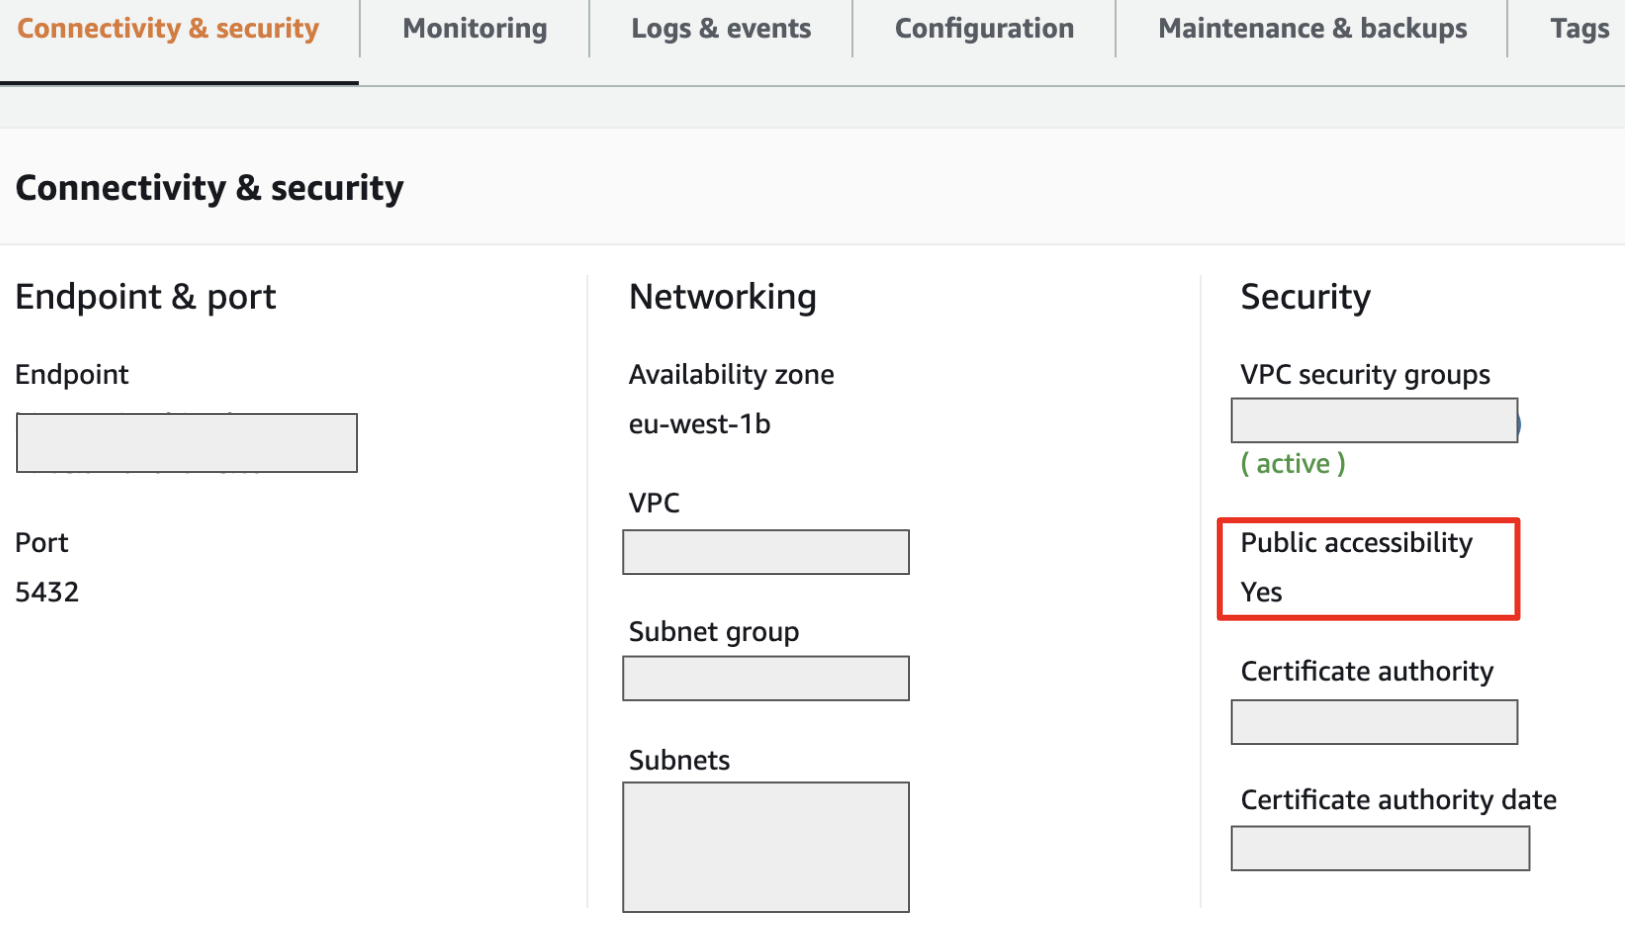
Public Access
Please see the relevant AWS instructions. The connectivity of your RDS service should look like the screen capture below:
Create the Database
You can create the Hive database directly in SQL or through the UI by using a database client tool like pgAdmin or Postico. From the database client, create a connection to your database service and create a database that will store all the Hive metadata.
Create the Hive Schema
The last step to prepare the Hive metastore is to create the Hive schema. Retrieve the following SQL scripts:
Look for \i hive-txn-schema-2.3.0.postgres.sql; in the first script and replace it with the content of the second script. Then run the whole script in your database client tool.
The above scripts are for Hive 2.3 and PostgreSQL. You can find scripts for other Hive versions and databases in the Apache Hive repository.
Hive version 2.3 is the Spark default. Unless you have specific constraints, you should choose this version.
Connect to a Hive Metastore Database
To connect to a Hive Metastore database, complete the following procedures:
- Add the JDBC Driver JAR file
- Configure your Spark applications to connect to the metastore
Add the JDBC Driver JAR File
In this step, you will add the JAR file containing the JDBC driver of your database to your Spark applications.
For PostgreSQL the JAR file can be found in the MVN repository.
Option 1: Download and Copy the JDBC driver JAR file to your Spark image
Add the JAR file directly to your Spark docker images:
FROM gcr.io/ocean-spark/spark:platform-3.0.2-latest
COPY ./jars/postgresql-42.2.20.jar /opt/spark/jars/postgresql-42.2.20.jar
Option 2: Define the JAR file as a dependency in your Spark applications
The JAR will then be downloaded at runtime when each Spark application starts:
"deps": {
    "jars": [
      "https://repo1.maven.org/maven2/org/postgresql/postgresql/42.2.20/postgresql-42.2.20.jar"
    ]
  }
For a complete reference on template attributes see the Spot API reference.
Configure Your Spark Applications to Connect to the Metastore
You can use either of the options below.
Option 1: Add the configurations to your sparkConf
Define or modify a configuration template to include the following flags:
"sparkConf": {
    "spark.sql.catalogImplementation": "hive",
    "spark.sql.hive.metastore.sharedPrefixes": "org.postgresql",
    "spark.hadoop.javax.jdo.option.ConnectionURL": "jdbc:postgresql://hive1...xxx...amazonaws.com:5432/hive1",
    "spark.hadoop.javax.jdo.option.ConnectionPassword": "xxx",
    "spark.hadoop.javax.jdo.option.ConnectionUserName": "xxx",
    "spark.hadoop.javax.jdo.option.ConnectionDriverName": "org.postgresql.Driver",
    "spark.hadoop.hive.metastore.warehouse.dir": "... Accessible Cloud Storage ..."
  }
Additionally if you use an older version of Hive, you can add:
   "spark.sql.hive.metastore.version": "... version number ...",
   "spark.sql.legacy.timeParserPolicy": "LEGACY"
Option 2: Configure the connection in the core-site.xml file
You can also specify these configurations in the core-site.xml file, which has the added benefit of hiding the database credentials. The following flags should be set in the core-site.xml file. Other flags can still be passed using the sparkConf.
<configuration>
    <property>
        <name>javax.jdo.option.ConnectionURL</name>
        <value>jdbc:postgresql://hive1......amazonaws.com:5432/hive1</value>
    </property>
    <property>
        <name>javax.jdo.option.ConnectionPassword</name>
        <value>xxx</value>
    </property>
    <property>
        <name>javax.jdo.option.ConnectionUserName</name>
        <value>xxx</value>
    </property>
    <property>
        <name>javax.jdo.option.ConnectionDriverName</name>
        <value>org.postgresql.Driver</value>
    </property>
</configuration>
This file should be added in a folder defined by an environment variable ($HADOOP_CONF_DIR) read by Spark. Read our documentation on how to configure environment variables.
The hive-site.xml file can be added directly into your docker image by following this example:
FROM gcr.io/ocean-spark/spark:platform-3.1.1-latest`

COPY requirements.txt .
RUN pip3 install -r requirements.txt

EXPORT HADOOP_CONF_DIR=/opt/spark/hive
COPY hive-site.xml /opt/spark/hive

COPY src/ src/
COPY main.py .
Alternatively, you can define the hive-site.xml file as a Kubernetes secret and mount it into your Spark pods.
To do this, you will need kubectl access to your cluster. Write the desired hive-site.xml file locally, and then run the following command:
kubectl create secret generic <your-secret-name> --from-file=/path/to/hive-site.xml -n spark-apps
You should then make a few edits to your Spark application configurations:
- Add a
volumeskey with a reference to the Kubernetes secret you created and a name - Add a
volumeMountssection to your driver and executor configurations. Itsnamefield references the volume name defined above, while the mountPath tells Kubernetes where to mount the file. - Do not forget to set the HADOOP_CONF_DIR environment variable so Spark knows to look for the hive-site.xml file at the right location.
Here's what your Spark application configuration should look like:
   "driver": {
    "envVars": {
      "HADOOP_CONF_DIR": "/opt/spark/hive"
    },
    "volumeMounts": [
      {
        "name": "hive-credentials",
        "mountPath": "/opt/spark/hive"
      }
    ],
  },
  "executor": {
    "envVars": {
      "HADOOP_CONF_DIR": "/opt/spark/hive"
    },
    "volumeMounts": [
      {
        "name": "hive-auth",
        "mountPath": "/opt/spark/hive"
      }
    ]
  },
  "volumes": [
    {
      "name": "hive-credentials",
      "secret": {
        "secretName": "hive-credentials"
      }
    }
  ]
What's Next?
Learn more about the Ocean Spark features in the Product Tour.