Connect an AKS Private Cluster
Ocean supports the management and optimization of AKS private clusters. This tutorial describes how to connect your AKS private cluster to Ocean.
When you use a private cluster, the Kubernetes API uses only an internal IP which ensures that your API works only on the private network and is not exposed to the outside world.
Once you have connected your AKS private cluster to Ocean, your cluster will benefit from all the cost savings and optimizations provided by the Ocean serverless experience.
Access the Private AKS Cluster
You need to have terminal access to the cluster API in order to apply new resources and run scripts. When running a private cluster, you can use any of the following access methods:
- Create a VM in the same Azure Virtual Network (VNet) as the AKS cluster.
- Use a VM in a separate network and set up virtual network peering.
- Use an Express Route or a VPN connection.
- Use the AKS Run Command feature.
Procedures in this tutorial require CLI commands and use the Azure AKS Run Command feature.
If you already have access to your AKS cluster API (kubectl) through a VM/VPN, complete the procedures in Connect an Existing AKS Cluster. Otherwise, use the procedures on this page.
Prerequisites
- Your Azure subscription connected to Spot
- A Kubernetes private cluster on AKS running at least one node
- The Kubernetes command-line tool, kubectl, installed on your workstation and configured to work with the relevant AKS cluster
Example: Registration Using AKS Run Command Feature
If you are using the AKS Run Command feature, complete the steps below.
-
Run the following command:
az feature register --namespace "Microsoft.ContainerService" --name "RunCommandPreview"This triggers a registration process that takes a few minutes.
-
Validate that the feature was registered using the following command:
az feature list -o table --query "[?contains(name, 'Microsoft.ContainerService/RunCommandPreview')].{Name:name,State:properties.state}"You should see that the State is Registered as shown below.

-
To propagate the change, run the following command:
az provider register --namespace Microsoft.ContainerService -
Get the cluster credentials:
az aks get-credentials --resource-group <resource_group_name> --name <cluster_name>
Get Started
In the left menu of the Spot console, click Ocean/Cloud Clusters, and click Create Cluster.

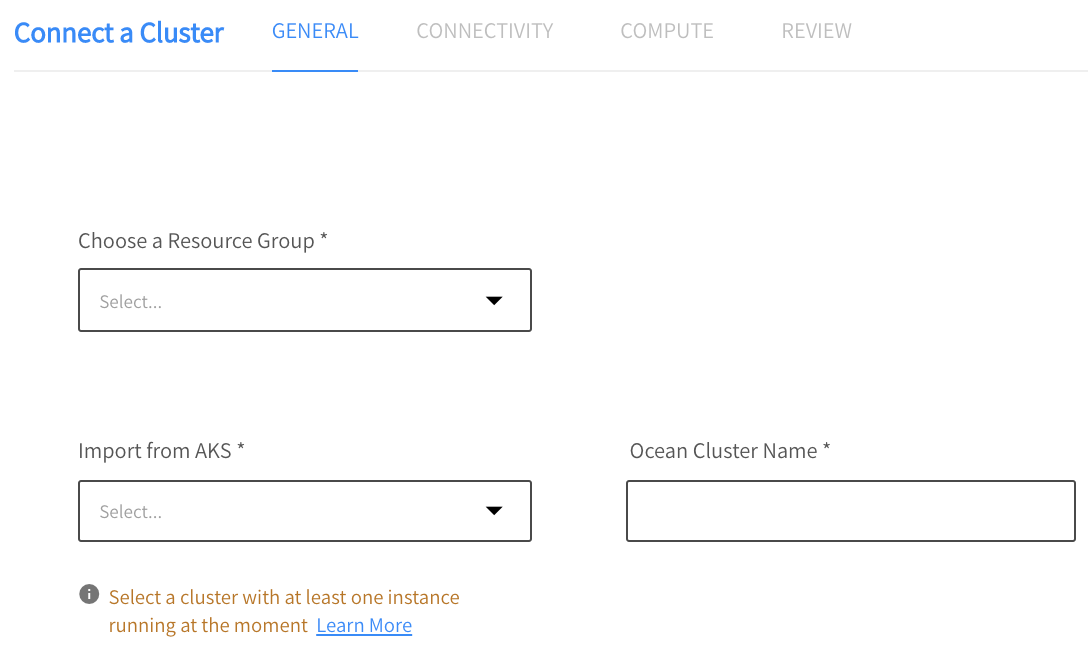
General
-
In the General page, choose the following from the dropdown lists:
- Resource Group: The Azure resource group that contains the AKS cluster.
- Import from AKS: The AKS cluster to import.
-
For the Ocean Cluster Name, the system will copy the name of the AKS cluster to this field. Although you can modify it, we recommend that you leave it the same as the original AKS cluster name. This will make it easier to identify related entities in each system.
-
Click Next.
Connectivity
Step 1: Spot Token
On the Connectivity page, create a Spot token (or use an existing one) and copy it to the text box. You may also want to copy it to a safe place so that you can use it again.
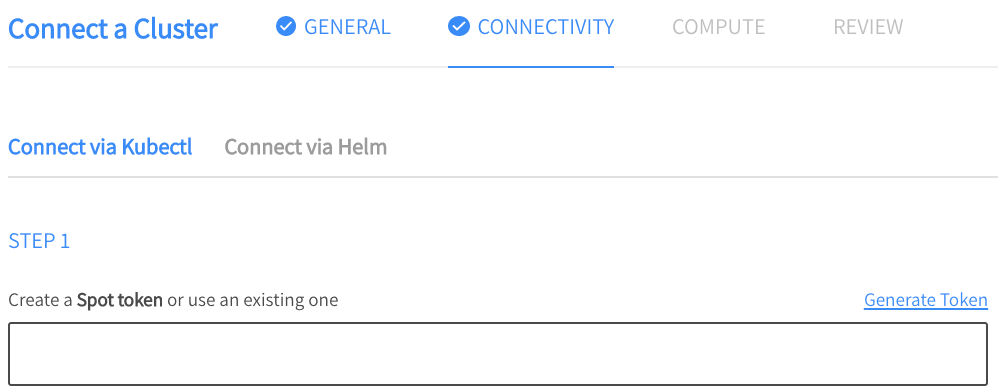
Step 2: Cluster Controller ID
Use the automatically generated Cluster Controller ID or enter a new one.

Step 3: Install Controller
Instead of Step 3 on the Connectivity page, complete a procedure that consists of the following parts:
- Create Ocean Controller ConfigMap
- Install the Controller
The steps are described below.
Create Ocean Controller ConfigMap
The purpose of this procedure is to populate the environment variables needed for the Ocean Controller to run.
- Create a configMap.yaml file in the format shown below. Descriptions of the attributes are also provided below.
kind: ConfigMap
apiVersion: v1
metadata:
  name: spotinst-kubernetes-cluster-controller-config
  namespace: kube-system
data:
  spotinst.token: <TOKEN>
  spotinst.account: <ACCOUNT_ID>
  spotinst.cluster-identifier: <IDENTIFIER>
  proxy-url: <Proxy-URL> i.e http://hello-world.com:82/
  disable-auto-update: <"true"/"false">
Tip: Both the token and account can also be created as a Kubernetes Secret with the name spotinst-kubernetes-cluster-controller. The keys should be token and account.
-
To apply the configuration to the configMap, run the command:
az aks command invoke -g <resource_group_name -n <cluster_name> -c "kubectl apply -f configMap.yaml" -f configMap.yaml
Configuration Attribute Descriptions
spotinst.token - The token is used in order to have programmatic access to the Spot platform. If you don’t already have a token, see Create an API Token.
spotinst.account - Spot Account ID. To find your account ID, click on the User icon on the upper right of the Spot console and click My Account.
spotinst.cluster-identifier - A unique identifier (at the Account level) that will bind the Controller to the Ocean resource.
proxy-url - Optional. When configured, the Controller outbound (egress) communication will go through the provided proxy server.
disable-auto-update - The default value is false (which means auto-update is enabled). For more information, see Controller Auto-Update.
Install the Controller
This procedure applies the Ocean Controller template which creates the following Kubernetes resources in the cluster:
- Deployment
- ClusterRole
- ClusterRoleBinding
- ServiceAccount
Complete the following steps:
-
Run the command:
az aks command invoke -g <resource_group_name> -n <cluster_name> -c "kubectl apply -f https://s3.amazonaws.com/spotinst-public/integrations/kubernetes/cluster-controller/spotinst-kubernetes-cluster-controller-ga.yaml" -
If this is the first time you use az aks command, the following message will appear:
The command requires the extension aks-preview. Do you want to install it now? The command will continue to run after the extension is installed. (Y/N)EnterY. Otherwise, continue to the next step. -
Verify the controller is up and running by running the following command:
az aks command invoke -g <resource_group_name> -n <cluster_name> -c "kubectl get pods -n kube-system | grep spotinst-kubernetes-cluster-controller"You should see a response like the one below:

Step 4: Import Cluster Configuration
Instead of Step 4 on the Connectivity page, complete the procedure below.
This procedure runs a job in the AKS cluster that imports the configurations required for creating an Ocean cluster. The job creates a record in the Spot database with the specified SPOT_ACD_IDENTIFIER. That record is used later for creation of the Ocean cluster.
Do not click Next on the Connectivity page until this step has completed.
-
Create a file called spot-aks-connector.yaml using the latest version of this template for the content.
-
The SPOT_ACD_IDENTIFIER is a unique identifier for the configuration import process. Copy the value from the Connectivity page and paste it into the appropriate line in the file.
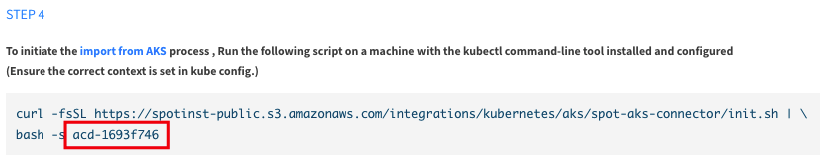
The other variables are derived automatically from the controller ConfigMap.
-
Apply the job using the following command:
az aks command invoke -g <resource_group_name> -n <cluster_name> -c "kubectl apply -f spot-aks-connector.yaml" -f spot-aks-connector.yaml -
Verify that the job completed successfully:
az aks command invoke -g <resource_group_name> -n <cluster_name> -c "kubectl get pods -A | grep get-waagent"You should see a response like the one below.

-
After this job has completed, click Next in the Connectivity page.
If you clicked Next on the Connectivity page before Step 4 completed, Spot will have generated a new SPOT_ACD_IDENTIFIER. In this case, you must complete the procedure below to delete the job and run it again with the new ID.
-
Delete the job:
az aks command invoke -g <resource_group_name> -n <cluster_name> -c "kubectl delete -f spot-aks-connector.yaml" -f spot-aks-connector.yaml -
Update the yaml file with the new SPOT_ACD_IDENTIFIER.
-
Run the job again:
az aks command invoke -g <resource_group_name> -n <cluster_name> -c "kubectl apply -f spot-aks-connector.yaml" -f spot-aks-connector.yaml
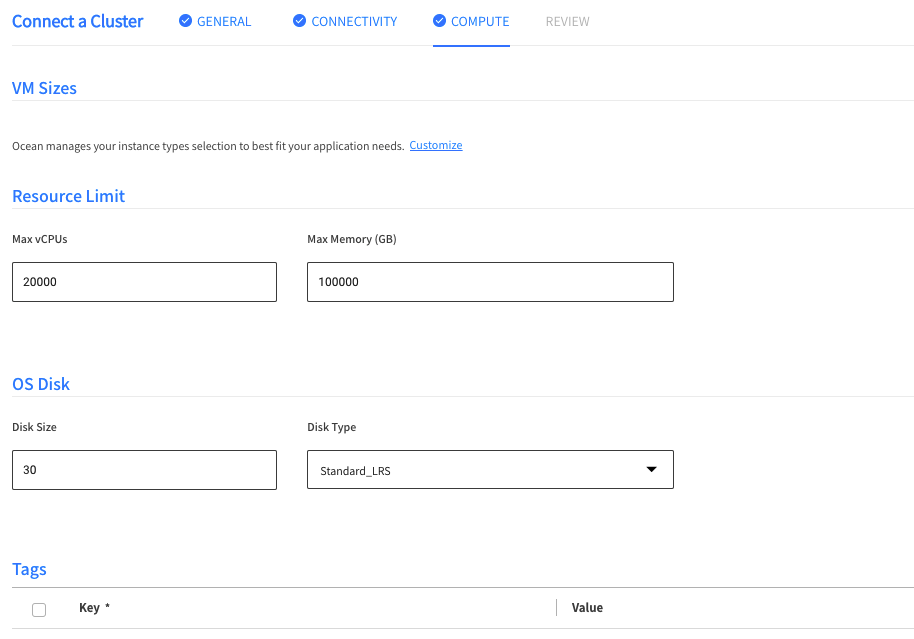
Compute
On the Compute page, you will see that the fields are populated with the values imported from the AKS private cluster configuration. You may choose to keep these values or modify them.
After reviewing the Compute page or adding any additional information (e.g., you may want to add additional tags), click Next.
Review
In the Review page, you can see a summary of the entire configuration. You also have the option to view the configuration in JSON format.

After reviewing the configuration, click Create.
Now that you have created the Ocean cluster and virtual node group, Ocean will take care of provisioning your data plane infrastructure as required by your pods across the cluster.
It is recommended to migrate the existing nodes to Ocean by draining them and allowing Ocean to scale. (This is done in the Azure interface.)
Alternative Ways to Create Ocean Cluster
Once you have completed all the procedures in the Connectivity section, there are alternative methods of creating the Ocean Cluster. Instead of using the procedures in the Compute and Review sections above, you could choose one of the following:
- Spot APIs: Use the Spot APIs available on the Spot OpenAPI site. You will need to create both an Ocean cluster and a virtual node group using the following APIs:
- Terraform: Use Terraform resources. You will need to create both an Ocean cluster and a virtual node group using the following Terraform resources: