Configure Clusters
This section shows you how to configure your Ocean for Apache Spark (OfAS) cluster. You can configure the cluster ingress, log collection, Spark application namespaces, and more. You can also refer to the API documentation and the Terraform module to see the different cluster configuration options.
Ingress
Some of the Ocean for Apache Spark features require inbound connectivity to be set up on the cluster. These features are:
- Notebooks.
- Live driver and Kubernetes log streams while the Spark application is running.
- Access to the Spark UI while the Spark application is running.
The Ocean for Apache Spark installation provisions a public load balancer by default. The load balancer is configured to only accept traffic from the Ocean for Apache Spark control plane IP address and the communication is protected by mutual TLS.
The following configuration options enable you to customize this setup:
Load Balancer Service Annotations
Ocean for Apache Spark creates a LoadBalancer service called ofas-ingress-nginx-controller in the spot-system namespace by default. This service triggers the creation of a load balancer by your cloud provider. To customize the load balancer that gets provisioned, you can set additional annotations on the LoadBalancer service. Different annotations are supported on different cloud providers.
Example of a cluster configuration:
{
  "cluster": {
    "config": {
      "ingress": {
        "loadBalancer": {
          "serviceAnnotations": {
            "service.beta.kubernetes.io/aws-load-balancer-additional-resource-tags": "Environment=dev,Team=data-science",
            "service.beta.kubernetes.io/aws-load-balancer-nlb-target-type": "ip",
            "service.beta.kubernetes.io/aws-load-balancer-scheme": "internet-facing",
            "service.beta.kubernetes.io/aws-load-balancer-target-group-attributes": "preserve_client_ip.enabled=true",
            "service.beta.kubernetes.io/aws-load-balancer-type": "external"
          }
        }
      }
    }
  }
}
The example above for AWS shows the choice to provision a Network Load Balancer instead of the default Classic Load Balancer. You can also set additional tags on the load balancer and enable client IP preservation.
Note: For this to work, install the AWS Load Balancer Controller on your cluster.
If you are adding configuration annotations to an existing load balancer service, you may need to re-create it in some cases for them to work properly. The easiest way to do this is to uninstall the ofas-ingress-nginx component. It is automatically re-installed with the new configuration.
helm delete ofas-ingress-nginx -n spot-system
AWS PrivateLink
You can configure your cluster so that the inbound connections go over an AWS PrivateLink if you are using AWS. You can use this Terraform example to set this up easily. Read on for more details.
Prerequisites
The infrastructure necessary for the AWS PrivateLink connection must be set up in your AWS account and must include:
- A target group with IP address target type, handling IPv4 traffic over TCP on port 443.
- A network load balancer that forwards traffic to the target group. This load balancer can be internal.
- A VPC endpoint service. This VPC endpoint service should be connected to the network load balancer. You can set acceptance required to false and add the OfAS AWS account as an allowed principal (arn:aws:iam::066597193667:root). See the AWS documentation for more details.
- The AWS Load Balancer Controller must be installed on your cluster.
Example of a cluster configuration:
{
  "cluster": {
    "config": {
      "ingress": {
        "loadBalancer": {
          "managed": false,
          "targetGroupArn": "arn:aws:elasticloadbalancing:region:XXXXXXXXXXXX:targetgroup/target-group-name/XXXXXXXXXXXXXXXX"
        },
        "privateLink": {
          "enabled": true,
          "vpcEndpointService": "com.amazonaws.vpce.region.vpce-svc-XXXXXXXXXXXXXXXXX"
        }
      }
    }
  }
}
Explanation of the example:
loadBalancer.managed = false– OfAS does not provision a load balancer for the OfAS cluster.loadBalancer.targetGroupArn- The ARN of the target group linked with the load balancer you want to use. OfAS deploys aTargetGroupBindingcalledocean-spark-ingressin thespot-systemnamespace linking the ingress controller service with the target group.privateLink.enabled = true- Enable AWS PrivateLink connection between the OfAS control plane and OfAS cluster.privateLink.vpcEndpointService- The VPC endpoint service name.
An endpoint connection appears on your endpoint service, with the owner 066597193667. The endpoint connection should be marked as available.
In addition, ensure that you set up your node security group to allow traffic from the load balancer.
Use an Existing Load Balancer
If you are using AWS, you can have OfAS use an existing load balancer instead of provisioning a new one. OfAS will still install an ingress controller, but it will be linked with an existing load balancer using a TargetGroupBinding.
Prerequisites
- A target group with IP address target type, handling IPv4 traffic over TCP on port 443.
- An internet facing (network) load balancer that forwards traffic to the target group.
- The AWS Load Balancer Controller should be installed in your cluster.
Example of a cluster configuration
{
  "cluster": {
    "config": {
      "ingress": {
        "loadBalancer": {
          "managed": false,
          "targetGroupArn": "arn:aws:elasticloadbalancing:region:XXXXXXXXXXXX:targetgroup/XXX/XXX"
        },
        "customEndpoint": {
          "enabled": true,
          "address": "custom-address.example.com"
        }
      }
    }
  }
}
Explanation of the example:
loadBalancer.managed = false- OfAS will not provision a load balancer for the OfAS cluster.loadBalancer.targetGroupArn- The ARN of the target group linked with the load balancer you want to use. OfAS will deploy aTargetGroupBindingcalledocean-spark-ingressin thespot-systemnamespace linking the ingress controller service with the target group.customEndpoint- Setenabledto true and in theaddressfield, enter the address that the OfAS control plane will use to communicate with the OfAS cluster. This is the DNS name of your public load balancer.
Ensure that you set up your node security group to allow traffic from the load balancer.
Node Security Group
Your node security group must allow traffic from the load balancer, over TCP on port 443. For the load balancer health checks, you can either allow traffic from your VPC CIDR, or the private IP addresses used by the load balancer nodes. See the AWS documentation for more information.
If everything is configured correctly, you should see a healthy target in your target group. The target IP address should be the IP address of the ofas-ingress-nginx-controller pod running in the spot-system namespace.
In addition, ensure that client IP preservation is enabled and open your node security group to traffic from the OfAS control plane. See the section on allowing traffic from the OfAS control plane for more details.
Use an Existing Ingress Controller
Ocean for Apache Spark installs an ingress-nginx ingress controller by default. The ingress controller resides in the spot-system namespace and is called ofas-ingress-nginx. The ofas-ingress-nginx controller is configured to only manage Ocean for Apache Spark ingresses using an ingress class with the name spot-bigdata-nginx. You can therefore safely allow Ocean for Apache Spark to deploy its own ingress controller, it will live alongside your existing ingress controller.
However, you can configure the Ocean for Apache Spark installation to use an existing ingress controller instead of installing a new one. For example, this is useful if you want to use Istio on your OfAS cluster.
Example of a cluster configuration:
{
  "cluster": {
    "config": {
      "ingress": {
        "controller": {
          "managed": false
        },
        "loadBalancer": {
          "managed": false
        },
        "customEndpoint": {
          "enabled": true,
          "address": "custom-address.example.com"
        }
      }
    }
  }
}
Explanation of the example:
controller.managed = false- OfAS will not install an ingress controller on the OfAS cluster.loadBalancer.managed = false- OfAS will not provision a load balancer for the OfAS cluster.customEndpoint- Setenabledto true and theaddressfield should contain the address that the OfAS control plane will use to communicate with the OfAS cluster. For example, this can be theloadBalancer.ingress.hostnameof theLoadBalancerservice on your OfAS cluster.
Setting up Ingresses
If you use your own ingress controller, the OfAS installation will not provision ingresses for the services that need to be exposed. This must be done separately.
Ingresses are protected by mutual TLS. The bigdata-operator component is responsible for creating and updating a secret called spot-bigdata-tls, which contains the TLS certificates.
By default, this secret is created in the spot-system namespace. If this secret is required in a different namespace, you can label the namespace with operator.bigdata.spot.io/injectTLSSecret=true:
kubectl label namespace example-namespace operator.bigdata.spot.io/injectTLSSecret=true
Connections from the OfAS control plane to the OfAS cluster use a hostname of the form org-$SPOT_ORGANIZATION_ID-$OCEAN_SPARK_CLUSTER_ID.bigdata.svc.cluster.local, where $SPOT_ORGANIZATION_ID is the Spot organization ID and $OCEAN_SPARK_CLUSTER_ID is the OfAS cluster ID.
Example: org-XXXXXXXXXXXX-osc-XXXXXXXX.bigdata.svc.cluster.local
To find your Spot organization ID, in the menu in the top right corner of the Spot console click My Organzation. The OfAS cluster ID is in the cluster list in the Spot console in the form osc-XXXXXXXX.
Ingress-nginx
Example ingress definitions (change the host name and the ingress class):
apiVersion: networking.k8s.io/v1
kind: Ingress
metadata:
  annotations:
    nginx.ingress.kubernetes.io/auth-tls-secret: spot-system/spot-bigdata-tls
    nginx.ingress.kubernetes.io/auth-tls-verify-client: "on"
    nginx.ingress.kubernetes.io/proxy-read-timeout: "600"
    nginx.ingress.kubernetes.io/rewrite-target: /$1
  name: bigdata-notebook-service
  namespace: spot-system
spec:
  ingressClassName: nginx
  rules:
    - host: org-XXXXXXXXXXXX-osc-XXXXXXXX.bigdata.svc.cluster.local
      http:
        paths:
          - backend:
              service:
                name: bigdata-notebook-service
                port:
                  number: 80
            path: /bigdata-notebook-service/?(.*)
            pathType: Prefix
  tls:
    - hosts:
        - org-XXXXXXXXXXXX-osc-XXXXXXXX.bigdata.svc.cluster.local
      secretName: spot-bigdata-tls
---
apiVersion: networking.k8s.io/v1
kind: Ingress
metadata:
  annotations:
    nginx.ingress.kubernetes.io/auth-tls-secret: spot-system/spot-bigdata-tls
    nginx.ingress.kubernetes.io/auth-tls-verify-client: "on"
    nginx.ingress.kubernetes.io/rewrite-target: /$1
  name: bigdata-proxy
  namespace: spot-system
spec:
  ingressClassName: nginx
  rules:
    - host: org-XXXXXXXXXXXX-osc-XXXXXXXX.bigdata.svc.cluster.local
      http:
        paths:
          - backend:
              service:
                name: bigdata-proxy
                port:
                  number: 80
            path: /bigdata-proxy/?(.*)
            pathType: Prefix
  tls:
    - hosts:
        - org-XXXXXXXXXXXX-osc-XXXXXXXX.bigdata.svc.cluster.local
      secretName: spot-bigdata-tls
Istio Ingress Gateway
The TLS secret must be in the namespace that your gateway is installed in. Ensure to enable TLS secret injection for that namespace, for example:
kubectl label namespace istio-ingress operator.bigdata.spot.io/injectTLSSecret=true
If this is not done, you may see warning logs like this in the log output of your istiod service:
$ kubectl logs istiod-584b74f7f9-XXXX -n istio-system

istiod-584b74f7f9-g7wkz discovery 2023-03-22T12:46:56.728332Z    warn    ads    failed to fetch ca certificate for kubernetes://spot-bigdata-tls-cacert: secret istio-ingress/spot-bigdata-tls not found
istiod-584b74f7f9-g7wkz discovery 2023-03-22T12:46:56.728347Z    warn    ads    failed to fetch key and certificate for kubernetes://spot-bigdata-tls: secret istio-ingress/spot-bigdata-tls not found
Now you can create a Gateway and VirtualService to expose the bigdata-proxy and bigdata-notebook-service services. For example (remember to change the host name):
apiVersion: networking.istio.io/v1alpha3
kind: Gateway
metadata:
  name: ocean-spark-gateway
  namespace: spot-system
spec:
  selector:
    istio: ingress
  servers:
    - port:
        number: 443
        name: https
        protocol: HTTPS
      tls:
        mode: MUTUAL
        credentialName: spot-bigdata-tls
      hosts:
        - org-XXXXXXXXXXXX-osc-XXXXXXXX.bigdata.svc.cluster.local
---
apiVersion: networking.istio.io/v1alpha3
kind: VirtualService
metadata:
  name: ocean-spark-virtual-service
  namespace: spot-system
spec:
  hosts:
    - org-XXXXXXXXXXXX-osc-XXXXXXXX.bigdata.svc.cluster.local
  gateways:
    - ocean-spark-gateway
  http:
    - match:
        - uri:
            prefix: /bigdata-proxy/
      rewrite:
        uri: /
      route:
        - destination:
            host: bigdata-proxy.spot-system.svc.cluster.local
            port:
              number: 80
    - match:
        - uri:
            prefix: /bigdata-notebook-service/
      rewrite:
        uri: /
      route:
        - destination:
            host: bigdata-notebook-service.spot-system.svc.cluster.local
            port:
              number: 80
Ensure that the Gateway selector matches your installation (istio: ingress in the example above). It must match the ingress gateway pod labels. See the Istio documentation for more information.
Also ensure to turn off Istio sidecar injection in your Spark application namespaces.
Install the AWS Load Balancer Controller
To use advanced load balancer configurations on AWS, install the AWS Load Balancer Controller on your cluster. See AWS documentation for instructions.
Ensure that your node security group allows traffic from the Kubernetes control plane security group over TCP on port 9443 (default). If not, you may see errors in the AWS Load Balancer Controller logs indicating that the AWS Load Balancer Controller webhook cannot be reached.
Configure Timeouts
When a notebook starts, the OfAS control plane issues a long running request that waits for the notebook to start running. Therefore, Spot recommends to increase the request timeout. One way to do this is with an annotation on your LoadBalancer service, for example:
# AWS
service.beta.kubernetes.io/aws-load-balancer-connection-idle-timeout: "1800"

# Azure
service.beta.kubernetes.io/azure-load-balancer-tcp-idle-timeout: "30"
Allow Traffic from the OfAS Control Plane
You can ensure that only the OfAS control plane can reach your nodes by setting the loadBalancerSourceRanges of your LoadBalancer service to the IP address of the OfAS control plane (54.198.192.164/32):
spec:
  loadBalancerSourceRanges:
    - 54.198.192.164/32
You can also do this manually, by adding an entry to your node security group to allow traffic over TCP on port 443 from source 54.198.192.164/32.
In addition, ensure that client IP addresses are preserved.
On AWS, you can find this under Target Group > Attributes > Preserve client IP addresses. You can also set an annotation on your LoadBalancer service:
service.beta.kubernetes.io/aws-load-balancer-target-group-attributes: preserve_client_ip.enabled=true
If this is not done and you have allowed traffic from the load balancer to your nodes over TCP on port 443 (for health checks), all inbound traffic will be allowed through the load balancer.
See the AWS documentation for more information.
Log Collection
The OfAS system collects logs from Spark applications. These logs are:
- The Spark event log.
- The Spark driver log.
- The Spark executor logs.
The Spark event log contains information from the Spark runtime. It is used to calculate metrics for the Spark application, analyze its efficiency and identify issues. It is also used to power the Spark UI, after the Spark application has finished.
The Spark driver and executor logs are the log streams from the Spark pods. They are collected and made available for download after the Spark application has finished.
You can turn off the driver and executor log collection on your OfAS cluster.
Example of a cluster configuration:
{
  "cluster": {
    "config": {
      "logCollection": {
        "collectDriverLogs": false
      }
    }
  }
}
Spark Application Namespaces
By default, Ocean for Apache Spark runs Spark applications in the spark-apps namespace.
You can configure additional Spark application namespaces in your OfAS cluster.
Example of a cluster configuration:
{
  "cluster": {
    "config": {
      "spark": {
        "appNamespaces": ["extra-spark-app-ns-1", "extra-spark-app-ns-2"]
      }
    }
  }
}
The spark-apps namespace is always the default if no namespace is specified in the Spark application submission. It is not necessary to create these namespaces beforehand, the bigdata-operator component creates them if they do not exist.
Istio Sidecar Injection
If you are using Istio, disable the Istio sidecar injection in the Spark application namespaces since the sidecar can interfere with the Spark pod lifecycle.
For example:
kubectl label namespace spark-apps istio-injection=disabled --overwrite
See the Istio documentation for more information.
Configure Webhook
The Spark Operator runs a MutatingAdmissionWebhook to mutate Spark pods as they are submitted to the cluster.
If you are using AWS EKS and using a custom CNI like Calico, you may need to enable host networking for the webhook to work.
An example of a cluster configuration:
{
  "cluster": {
    "config": {
      "webhook": {
        "useHostNetwork": true,
        "hostNetworkPorts": [25554]
      }
    }
  }
}
Ensure that your node security group allows traffic from the Kubernetes control plane security group over TCP on the host network port. If it is not allowed, you may see errors like Operation: [create] for kind: [Pod] with name: [null] in namespace: [spark-apps] failed and java.net.SocketTimeoutException: timeout in the Spark Operator logs.
Configure VNGs
This section shows you how to configure Virtual Node Groups (VNGs) for Ocean for Apache Spark.
Automatically Created VNGs
Ocean for Apache Spark creates three Virtual Node Groups (VNGs) by default on your Ocean cluster when the OfAS cluster is created:
- ocean-spark-on-demand
- ocean-spark-spot
- ocean-spark-system
If you prefer to create these VNGs using other methods, like Terraform, you can disable this.
The automatically created VNGs use taints by default to prevent non-Spark workloads from running on them. You can disable them.
Example of a cluster configuration:
{
  "cluster": {
    "config": {
      "compute": {
        "createVngs": true/false,
        "useTaints": true/false
      }
    }
  }
}
These configuration options only affect the initial cluster creation call.
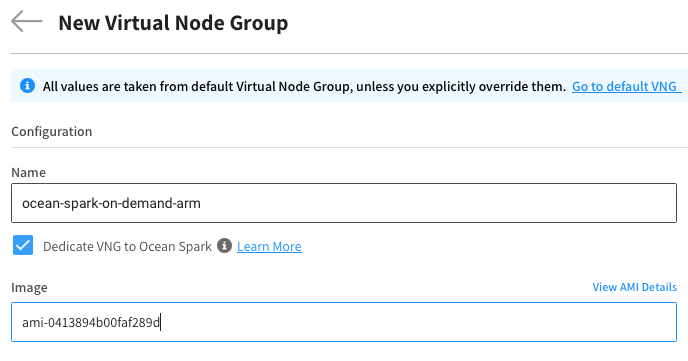
Create ARM VNGs
To run ARM workloads on Ocean for Apache Spark, you first need to create VNGs to manage your ARM instances. Similarly to AMD, you need to create two VNGs, one for On-demand instances and one for Spot instances. The last step is to dedicate the VNGs to Ocean for Apache Spark.
ARM VNG setup
This section shows you how to set up ARM VNGs on the different cloud providers.
AWS
Select an Amazon Machine Image suitable for ARM. View this list to select the right image according to the AMI ID in your region.
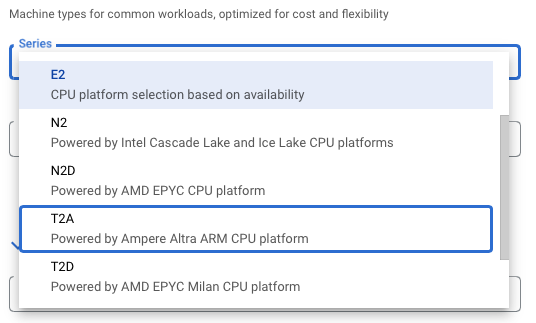
GCP
- Create a GKE node pool. Select the T2A machine type from that node pool.
- Create a new VNG by importing that node pool into your cluster.
Configure App
When ARM based VNGs are created in your cluster, it is important to note that all your apps, including existing ones, should now explicitly target a specific machine type, even AMD-based apps. If this is not done, the AMD apps might run on ARM instances and vice versa. This must be done for both driver and executors in the app configuration. Use the vngIds field to target your ARM or AMD VNGs accordingly.
"driver": {
  "coreRequest": "500m",
  "memory": "1000m",
  "spot": false,
  "vngIds": ["ols-XXXXXXXX"]
},
"executor": {
  "cores": 2,
  "coreRequest": "500m",
  "memory": "1000m",
  "vngIds": ["ols-XXXXXXXX"]
}
Alternatively, you can limit the choice of instance type by using the instanceAllowList field:
"driver": {
  "coreRequest": "500m",
  "memory": "1000m",
  "spot": false,
  "instanceAllowList": ["c6gn", "c6g", "m6g", "r6g"]
},
"executor": {
  "cores": 2,
  "coreRequest": "500m",
  "memory": "1000m",
  "instanceAllowList": ["c6gn", "c6g", "m6g", "r6g"]
}
When setting a value for the image field, check that ARM64 compatible images are being used. Starting with gen19, the spark images that Ocean for Apache Spark provides are multi-architecture and compatible with ARM64. These images are used by default if you don't provide a value for the image field.
Related Topics
Learn how to access your data.